Understanding Image Resolution: Pixels, DPI, and PPI Explained
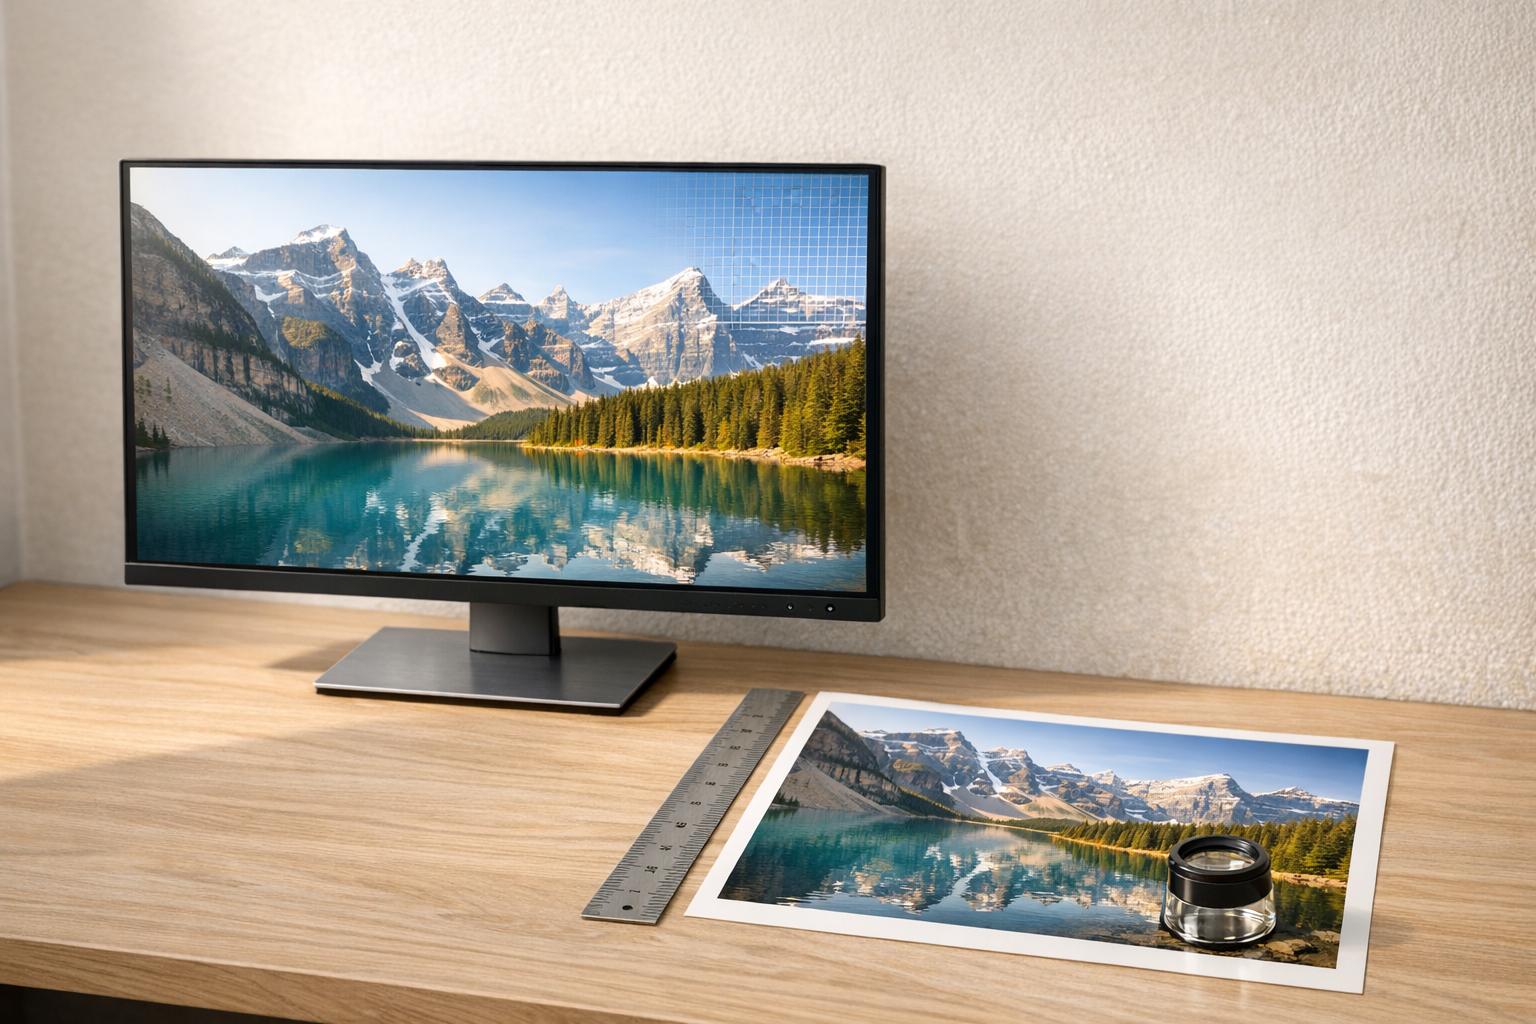
Image resolution determines how much detail a digital image holds, and it directly affects how sharp or blurry your photos look across screens, print materials, and online storefronts. If you’ve ever uploaded a product photo that looked crisp on your phone but pixelated on a desktop listing page, resolution is the reason.
Three terms come up constantly in resolution discussions, and they’re often confused:
- Pixels are the tiny squares of color that make up every digital image. An image that’s 3000 x 3000 pixels contains 9 million individual color points. More pixels means more detail — up to a point.
- PPI (Pixels Per Inch) describes how densely those pixels are packed when displayed on a screen. A 72 PPI image spreads pixels out; a 300 PPI image packs them tightly. Your monitor, phone, and tablet each have their own native PPI.
- DPI (Dots Per Inch) is technically a print term — it refers to how many ink dots a printer lays down per inch of paper. In everyday usage, people use DPI and PPI interchangeably, which is fine for practical purposes.
Here’s the key insight most guides skip: pixel dimensions matter more than DPI for anything digital. A 3000 x 3000 pixel image tagged as “72 DPI” and the same image tagged as “300 DPI” contain identical data. The DPI tag only matters when you send the file to a printer. For ecommerce, social media, and web use, focus on pixel dimensions first.
Resolution Requirements for Different Use Cases
Not every use case demands the same resolution. Uploading a 6000 x 6000 pixel image to a social media post wastes bandwidth and slows load times. Uploading a 500 x 500 pixel image to an Amazon listing looks cheap and unprofessional. Here’s what actually works.
Ecommerce Product Photos
Product images are your storefront. They replace the ability to pick something up, turn it over, and inspect the details. Low-resolution product photos don’t just look bad — they actively reduce conversion rates. Shoppers associate blurry images with low-quality products and untrustworthy sellers.
Most major ecommerce platforms require a minimum of 1000 pixels on the longest side to enable zoom functionality. But minimum isn’t the target — aim for 2000 to 3000 pixels on the longest side. This gives customers a smooth zoom experience and ensures your images look sharp on high-density Retina displays.
Social Media Content
Each platform has its own preferred dimensions, and they change regularly. The general principle: match the platform’s recommended size exactly. Uploading oversized images means the platform compresses them (often badly), and undersized images get stretched and blurred.
Print Materials
Print is where DPI actually matters. The standard for high-quality print is 300 DPI at the final printed size. A business card printed at 3.5 x 2 inches needs an image that’s at least 1050 x 600 pixels. A poster printed at 24 x 36 inches needs 7200 x 10800 pixels — that’s a massive file.
For large-format printing (banners, trade show displays), you can get away with 150 DPI because viewers stand further back. But for anything handheld — packaging, catalogs, business cards — stick with 300 DPI.
Recommended Resolution Reference Table
| Platform / Use Case | Recommended Resolution (px) | Aspect Ratio | Notes |
|---|---|---|---|
| Amazon Product Images | 2000 x 2000 | 1:1 | Min 1600px for zoom; 2000+ preferred |
| Shopify Product Photos | 2048 x 2048 | 1:1 | Square recommended; supports up to 4472 x 4472 |
| Etsy Listings | 2000 x 2000 | Flexible | Min 2000px on shortest side for zoom |
| eBay Product Photos | 1600 x 1600 | 1:1 | Min 500px; 1600+ for zoom |
| Instagram Feed Post | 1080 x 1080 | 1:1 | Also supports 1080 x 1350 (4:5 portrait) |
| Instagram Story / Reel | 1080 x 1920 | 9:16 | Full-screen vertical format |
| Facebook Feed Post | 1200 x 630 | 1.91:1 | Also works well at 1080 x 1080 |
| TikTok Video / Image | 1080 x 1920 | 9:16 | Vertical only; avoid letterboxing |
| Pinterest Pin | 1000 x 1500 | 2:3 | Tall pins perform best; min 600px wide |
| LinkedIn Post | 1200 x 627 | 1.91:1 | Square (1080 x 1080) also works well |
| Twitter / X Post | 1600 x 900 | 16:9 | In-stream images; also supports 1:1 |
| Google Shopping | 1500 x 1500 | 1:1 | Min 800 x 800; larger images rank better |
| Website Hero Banner | 1920 x 1080 | 16:9 | Match your site’s max content width |
| Email Marketing | 600 x 400 | 3:2 | Keep file size under 200KB for fast loading |
| Print (Brochures, Cards) | 300 DPI at final size | Varies | 4×6 print = 1200 x 1800px minimum |
| Large Format Print | 150 DPI at final size | Varies | 24×36 poster = 3600 x 5400px minimum |
How to Calculate If Your Image Is High Enough Resolution
The calculation is straightforward once you know the formula. For digital use, compare your image’s pixel dimensions against the platform’s requirements from the table above. If your image is 1500 x 1500 pixels and Amazon wants 2000 x 2000, you’re short by 500 pixels on each side — and that gap will show.
For print, use this formula:
Required pixels = Print size (inches) x DPI
Want to print an 8 x 10 inch photo at 300 DPI? You need 2400 x 3000 pixels. Have a 1200 x 1500 pixel image? That’s only enough for a sharp 4 x 5 inch print at 300 DPI, or a passable 8 x 10 at 150 DPI.
For ecommerce specifically, here’s a practical checklist:
- Check your source file dimensions. Right-click the image file and check properties (Windows) or Get Info (Mac). Look at the pixel dimensions, not the file size in MB.
- Compare against your selling platform’s zoom threshold. If the platform enables zoom at 1600px and your image is 1400px, customers can’t zoom — and many will bounce.
- Test on multiple devices. An image that looks fine on a laptop might look soft on a 4K monitor or a phone with a high-density display. When in doubt, go bigger.
- Check after compression. Platforms compress your uploads. Start with a higher-resolution original so the compressed version still looks clean.
Common Resolution Mistakes That Hurt Ecommerce Conversions
After working with thousands of product images, these are the resolution-related mistakes that consistently cost sellers money.
1. Using Manufacturer-Provided Images Without Checking Quality
Dropshippers and resellers often grab images straight from a supplier’s website or catalog. These are frequently low-resolution, heavily compressed, or sized for a thumbnail — not a product listing. If you can see JPEG compression artifacts (blocky patches, color banding around edges), your customers can too.
2. Cropping Too Aggressively
Every crop removes pixels permanently. Start with a 3000 x 3000 image, crop to isolate the product, and you might be left with 800 x 800 — below the zoom threshold. If you need to crop heavily, start with the highest resolution source you can get.
3. Upscaling With Basic Software
Dragging a 500px image to 2000px in Photoshop or Preview doesn’t add detail — it adds blur. Traditional upscaling (bicubic interpolation) just smears existing pixels across more space. The image gets bigger in dimensions but looks worse. AI-powered upscaling is a different story, which we’ll cover below.
4. Ignoring Mobile Display Requirements
Over 70% of ecommerce browsing happens on mobile. Modern phones have pixel densities of 400+ PPI, meaning they pack an enormous number of pixels into a small screen. An image that looks acceptable on a 1080p desktop monitor can look noticeably soft on a flagship phone. This is another reason to target the upper end of platform recommendations rather than the minimum.
5. Saving in the Wrong Format
JPEG compression is lossy — every time you save a JPEG, it loses a tiny bit of quality. Edit and save as PNG or TIFF during your workflow, then export to JPEG only at the final step. And when you do export JPEG, use 85-92% quality. Going below 80% introduces visible artifacts, especially on product images with clean backgrounds and sharp edges.
6. Using Screenshots Instead of Downloads
A screenshot captures whatever’s on your screen at your screen’s resolution — typically 1440 x 900 or 1920 x 1080. That’s rarely enough for a product listing. Always download the original file instead of screenshotting it.
How to Upscale Low-Resolution Images With AI
Traditional upscaling hit a wall years ago: you can’t create detail that doesn’t exist in the source file. AI upscaling changed that. Modern AI models like Real-ESRGAN analyze patterns in the image and intelligently generate new detail as they scale up — sharpening edges, reconstructing textures, and adding clarity that wasn’t in the original.
The difference is dramatic. A blurry 600 x 600 product photo upscaled 4x with AI can produce a clean, detailed 2400 x 2400 image that’s suitable for ecommerce listings with zoom enabled. It won’t match a photo originally shot at that resolution with a DSLR, but for product photos where you’re working with limited source material, AI upscaling is a genuine solution.
PixelPanda’s AI upscaler uses Real-ESRGAN to upscale product photos up to 4x their original resolution. Upload a low-res image, choose your upscaling factor, and get a higher-resolution version in seconds. It’s particularly useful for ecommerce sellers who receive low-quality images from suppliers or need to repurpose older product photos that were shot at lower resolutions.
A few practical tips for getting the best AI upscaling results:
- Start with the best source you have. AI upscaling works better on a clean 800px image than a heavily compressed 800px image. If you have multiple versions of a photo, use the least compressed one.
- Remove background noise first. Artifacts, watermarks, and compression noise all get amplified during upscaling. Clean the image before you upscale it.
- Don’t upscale more than 4x. Going from 500px to 2000px (4x) produces solid results. Going from 250px to 2000px (8x) pushes the AI too far and introduces noticeable hallucinated details.
- Combine with background removal. For product photos, removing the background before or after upscaling gives you a clean, professional image ready for any platform. PixelPanda offers one-click background removal alongside upscaling, so you can handle both in a single workflow.
When Resolution Isn’t the Real Problem
Sometimes a product photo looks bad and resolution isn’t the culprit. Poor lighting, distracting backgrounds, inconsistent angles, and amateur composition all hurt conversions regardless of pixel count. A perfectly sharp 4000 x 4000 image of a product on a messy kitchen counter still looks unprofessional.
If your product photos need more than just upscaling — new backgrounds, better staging, consistent style across your catalog — AI-powered product photo generation can help. PixelPanda’s product photo studio generates professional-quality product images with clean backgrounds and studio-grade lighting, starting from a single reference photo. It’s a faster and more affordable alternative to booking a photographer for every SKU.
Frequently Asked Questions
What’s the difference between DPI and PPI?
DPI (Dots Per Inch) refers to the density of ink dots a printer places on paper. PPI (Pixels Per Inch) refers to the density of pixels displayed on a screen. In practice, most people use the terms interchangeably, and for digital images (ecommerce, social media, web), only the pixel dimensions matter — not the DPI/PPI tag embedded in the file metadata.
What resolution should product photos be for Amazon?
Amazon requires a minimum of 1000 pixels on the longest side but recommends 2000 pixels or more to enable their zoom feature. The ideal resolution for Amazon product photos is 2000 x 2000 pixels in a 1:1 (square) aspect ratio with a pure white background. Images below 1600 pixels won’t trigger zoom, which measurably hurts click-through and conversion rates.
Can I increase the resolution of an existing image?
Yes, but the method matters enormously. Traditional resizing (bicubic interpolation in Photoshop, Preview, or GIMP) simply stretches existing pixels, producing a blurry result. AI-powered upscaling tools use trained neural networks to intelligently add detail and sharpness as they increase resolution. AI upscaling can reliably improve images up to 4x their original size with good results.
Does higher resolution always mean better quality?
Not necessarily. Resolution is just one factor. A 5000 x 5000 pixel image that was heavily JPEG-compressed will look worse than a clean 2000 x 2000 image saved at high quality. Resolution defines the maximum potential detail, but compression, lens quality, lighting, and focus all affect the actual visual quality. For ecommerce, aim for high resolution and minimal compression — save final images as JPEG at 85%+ quality or use PNG for images with transparency.
What file format is best for ecommerce product photos?
JPEG is the standard for ecommerce product photos — it offers good compression with acceptable quality loss, keeping file sizes manageable for fast page loads. Use JPEG at 85-92% quality for the best balance. Use PNG when you need transparency (e.g., product on a transparent background for overlay use). Avoid BMP and TIFF for web — they’re unnecessarily large. WebP is increasingly supported and offers better compression than JPEG at equivalent quality, but check that your selling platform accepts it before converting your entire catalog.