AI image upscaling transforms low-resolution images into sharp, high-resolution visuals using deep learning. But achieving great results isn’t automatic – it requires careful preparation, the right tools, and systematic evaluation. Here’s a quick summary of what you need to know:
- Start with Quality: Use high-quality source images (RAW, PNG, or TIFF) to avoid artifacts.
- Choose the Right Scaling Factor: Match your resolution needs (e.g., 300 DPI for prints) without over-scaling.
- Pre-Process Images: Reduce noise, correct colors, and sharpen edges before upscaling.
- Pick Advanced Tools: Use AI models like CNNs or GANs for realistic textures and sharp details.
- Test and Refine: Compare results visually and with metrics like PSNR or LPIPS to catch distortions.
- Automate Workflows: Integrate tools like PixelPanda for batch processing and consistent results.
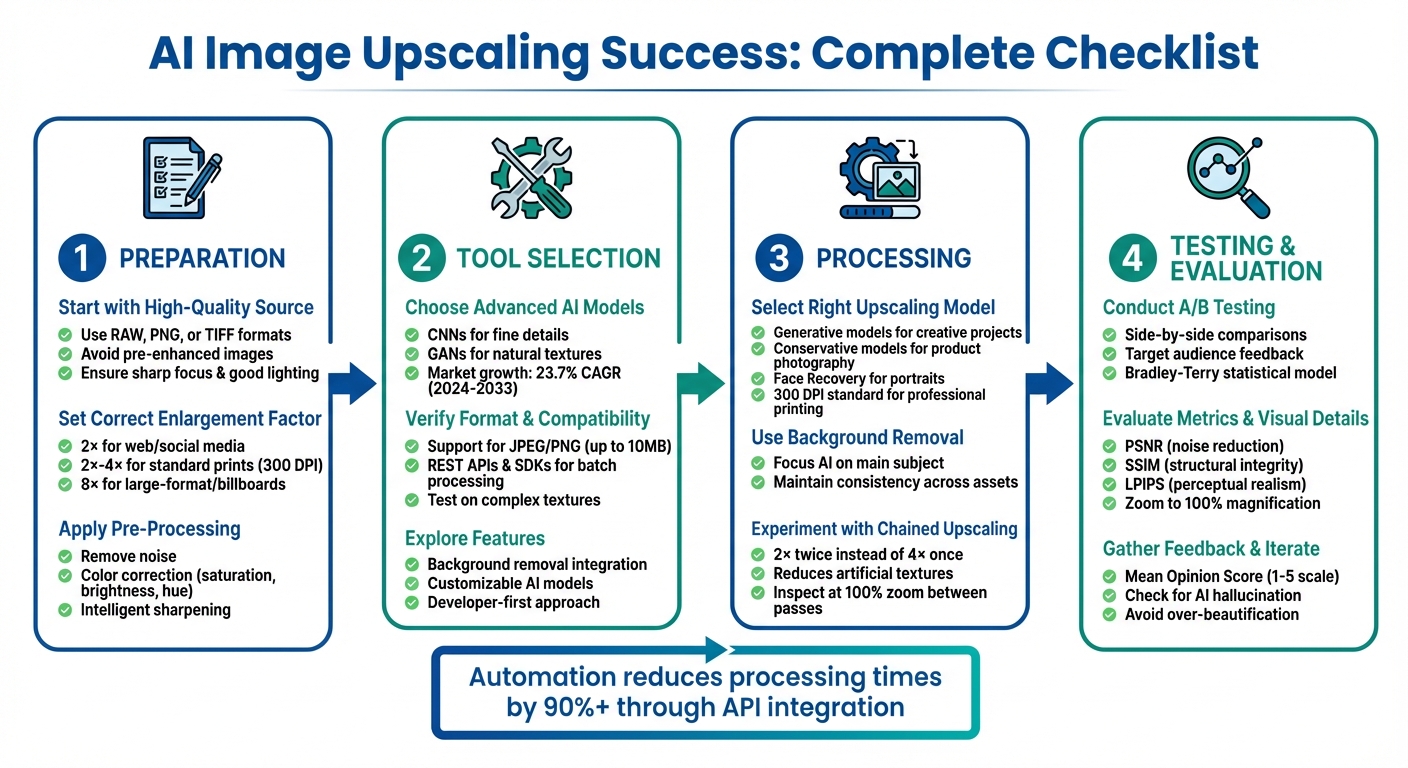
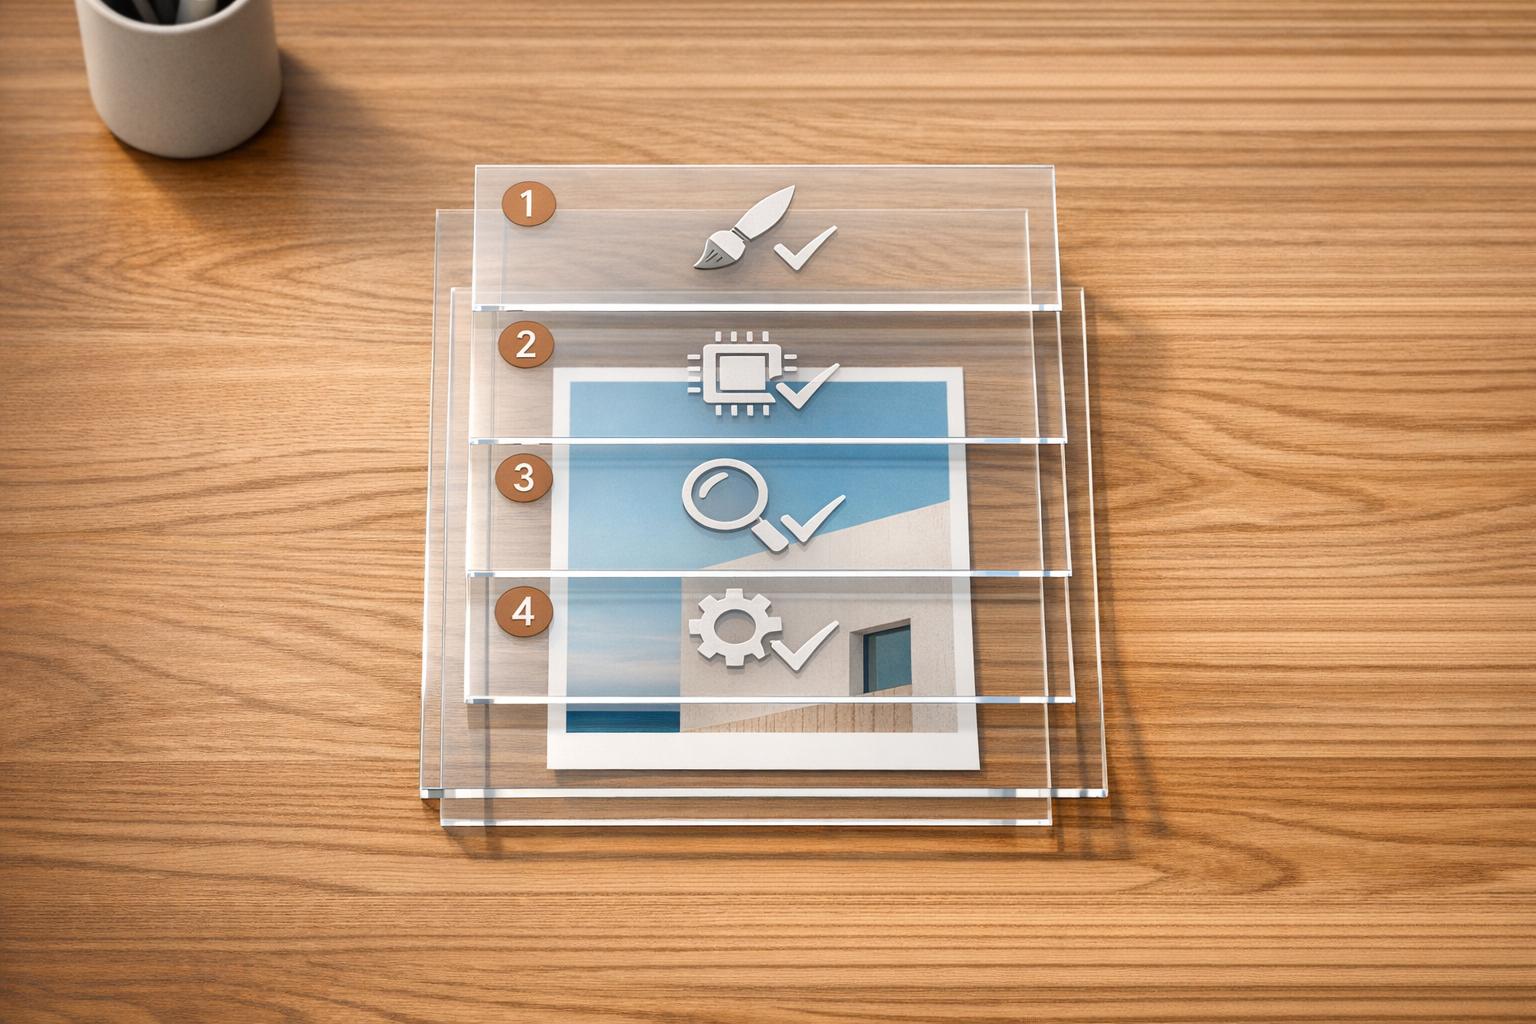
AI Image Upscaling Success Checklist: 4-Stage Workflow Guide
Preparation Checklist
Start with a High-Quality Source Image
The success of any upscaling process starts with the quality of your source image. Always aim to use the highest-quality original file you can find. Avoid upscaling images that have already been enhanced, as this can lead to compounded artifacts that degrade the final result.
Whenever possible, work with RAW files since they offer the most depth and detail. If RAW isn’t an option, choose uncompressed or lossless formats like PNG or TIFF over compressed formats like JPEG. Compression artifacts in JPEGs can become exaggerated during upscaling, turning small flaws into noticeable distortions.
Your source image should also be sharp and in focus. While AI tools can fix minor blur, they can’t restore detail in severely out-of-focus or motion-blurred shots. Additionally, images captured in good lighting with a low ISO setting tend to perform better, as they have less noise. High noise levels can confuse AI algorithms, leading to "hallucinated" textures or distortions.
"The better the input, the better the output." – UpscaleIMG.AI
Starting with a clean, high-quality source image lays the groundwork for successful enlargement.
Set the Correct Enlargement Factor
Choosing the right scaling factor is crucial to avoid wasting time or creating unnecessarily large files. To determine the target resolution, multiply your desired final dimensions (in inches) by 300 DPI.
For example, a 2× upscale increases the total pixel count by four times, making it a great choice for web graphics or social media. For standard photo prints, a scaling factor between 2× and 4× is typically sufficient to meet the 300 DPI requirement. However, for large-format prints like billboards, which often require resolutions of at least 9,000×3,000 pixels, you may need to scale up by 8×. Keep in mind that higher scaling factors increase the risk of unnatural patterns introduced by AI processing.
If you’re working with very low-resolution images, it’s often better to upscale by 2× twice rather than jumping straight to 4×. This step-by-step approach tends to produce more natural and visually pleasing results.
Once you’ve established the right scaling factor, you can move on to pre-processing the image for optimal results.
Apply Pre-Processing Techniques
Pre-processing is all about cleaning and preparing your image before the AI takes over. Start by removing noise, as this helps prevent the AI from mistaking grain for legitimate details in the photo. Use noise reduction tools and manually fix any visible imperfections to create a clean slate.
Next, focus on color correction. Adjust the saturation, brightness, and hue to ensure your image looks balanced and vibrant. This helps avoid washed-out colors or unexpected shifts during the upscaling process. Also, avoid saving your image in a low-quality compressed format before upscaling, as this can amplify compression artifacts.
Lastly, consider applying intelligent sharpening to enhance edge clarity. Be careful not to overdo it – sharpening should complement noise reduction, not enhance the grain. These small adjustments can make a significant difference, especially for professional e-commerce images where quality is non-negotiable.
With the right pre-processing techniques, you’ll set the stage for AI upscaling that delivers clean, polished results.
Tool Selection Checklist
Choose Tools with Advanced AI Models
Once you’ve laid the groundwork, picking the right tool becomes essential for achieving top-notch upscaling results. Tools powered by advanced AI models can create high-resolution details by analyzing image patterns, delivering lifelike textures and crisp edges.
Look for tools that leverage Convolutional Neural Networks (CNNs) for reconstructing fine details and Generative Adversarial Networks (GANs) to produce natural-looking textures. These technologies are especially useful for preserving realistic appearances in elements like skin, fabric, and hair.
"AI technology doesn’t guess – it generates. Because the model was trained on millions of high-resolution images, it learned what details typically appear in different types of images." – Julia Martins
The market for AI image upscaling is growing rapidly, with a projected CAGR of 23.7% from 2024 to 2033, potentially reaching $10.97 billion. Additionally, some tools offer specialized models, such as those designed for facial recovery or edge-focused enhancements, giving you the flexibility to handle a variety of projects.
Verify Format and Compatibility
Make sure the tool supports widely used formats like JPEG and PNG (up to 10 MB). It’s also important to check if it provides robust REST APIs and SDKs for batch processing, which are crucial for professional workflows relying on these file types.
Use demo pages to test the tool’s performance on complex textures like hair, fur, or fabric. Confirm that the tool offers the enlargement factors you need – such as 2×, 4×, or 8× – and that it can output resolutions suitable for your specific needs, whether it’s web graphics or high-quality prints at 300 DPI.
These compatibility checks will ensure a smooth transition to exploring the features of PixelPanda.
Explore PixelPanda‘s Image Upscaling Features

PixelPanda stands out with its developer-first approach, offering models specifically optimized for enhancing challenging textures like hair and fabric without creating the overly smooth, "plastic" effect common in lower-grade tools. To make testing easy, the platform provides an instant web demo and 5 free credits upon signup, allowing you to try it out with your own images.
Beyond upscaling, PixelPanda integrates features like background removal and customizable AI models through its REST API and SDKs. This all-in-one solution simplifies your image workflow, ensuring consistency across visual assets. Whether you’re working on product photographyxelpanda.ai/ai-product-photos”>product photography, fashion catalogs, or marketing campaigns, PixelPanda saves time while delivering polished results.
I tested every AI Image Upscaler… Here’s the Best!
Processing Checklist
Building on your tool selection, fine-tune processing steps to achieve the best results.
Select the Right Upscaling Model
Your choice of upscaling model determines whether the final image emphasizes natural details or introduces artificial textures. Generative models, for instance, can create new elements – like subtle skin textures or intricate fabric patterns – which makes them a great fit for creative projects or low-resolution AI-generated art. On the other hand, conservative models focus on interpolation and edge sharpening without inventing details, making them perfect for applications like product photography, forensic work, or document enhancement.
For portraits, use the "Face Recovery" feature to maintain natural skin tones and avoid an overly smooth, plastic-like appearance. For illustrations, such as "Digital Art" or "Anime", opt for models that preserve sharp outlines and vibrant colors. If you’re preparing images for professional printing at 300 DPI (the standard for high-quality output), ensure your tool supports large megapixel outputs – some advanced upscalers can handle resolutions up to 512 megapixels, ideal for billboard-sized prints.
A popular choice for photo-realistic results is ESRGAN (Enhanced Super-Resolution Generative Adversarial Networks). This architecture uses residual blocks and adversarial loss to guide neural networks toward producing natural-looking outputs. To calculate the resolution you need, multiply the desired dimensions in inches by 300 DPI.
Once you’ve selected your model, consider refining your image further by removing distractions with PixelPanda’s background removal feature.
Use PixelPanda’s Background Removal
Removing backgrounds before upscaling allows the AI to focus solely on the main subject, whether it’s a product, a person, or an object. By eliminating unnecessary details, you ensure sharper and more accurate results. PixelPanda integrates background removal directly into the upscaling process, saving time and maintaining consistency across your visual assets. For e-commerce brands handling thousands of product images, this combination of background removal and upscaling produces polished, professional visuals suitable for any platform. This streamlined approach boosts efficiency without compromising quality.
Experiment with Chained Upscaling
Rather than performing a single 4× upscaling pass, try using two 2× passes instead. This "chained" method reduces the risk of introducing artificial textures and gives you more control over sharpening at each stage. Extreme upscaling in one step can often lead to synthetic artifacts, especially when magnifying beyond 8×.
Julia Martins suggests: "Try upscaling in stages (2× twice instead of 4× once). Use selective masking to process different regions with different settings if some areas look good while others appear synthetic."
After each pass, inspect the image at 100% zoom to check for halos or over-sharpening, and adjust settings as needed. It’s also a good idea to remove noise before starting the upscaling process and apply sharpening only after the final pass. This approach prevents amplifying any existing artifacts. While chained upscaling may take more time and storage, its ability to preserve natural textures and provide greater control makes it a top choice for professional projects where quality is a priority.
sbb-itb-76ad1b7
Testing and Evaluation Checklist
After using advanced AI models and pre-processing techniques to refine your images, it’s essential to assess their quality through a structured evaluation process. This step is what distinguishes polished, professional results from amateur attempts.
Conduct A/B Testing
One of the most effective ways to evaluate your upscaled images is through A/B testing. Place the upscaled images side-by-side with their originals to identify subtle differences that may not be immediately obvious. This approach was highlighted in the MSU Video Upscalers Benchmark, where over 3,700 participants compared images directly to assess visual appeal. A/B testing gives you clear, actionable insights into which upscaling method delivers better results.
To make this testing relevant, involve people who align with your target audience. For example, professional photographers can provide valuable feedback on fine art prints, while general consumers are better suited for evaluating images intended for social media. The Bradley-Terry statistical model can also be used to calculate subjective quality values from these comparisons, offering a linear ranking of different methods. When testing multiple AI models, include a baseline upscaling method to measure relative improvements.
Once you’ve gathered subjective feedback, pair it with objective metrics for a more comprehensive evaluation.
Evaluate Both Objective Metrics and Visual Details
Objective metrics like PSNR (Peak Signal-to-Noise Ratio), SSIM (Structural Similarity Index), and LPIPS (Learned Perceptual Image Patch Similarity) provide numerical benchmarks for image quality. However, these metrics only tell part of the story. A thorough visual inspection is equally important to catch artifacts or distortions that might slip past the numbers. As Neha Kapoor, Brand Strategist at Snapcorn, explains:
"Traditional image quality metrics sometimes fail to capture the nuances of AI-enhanced images. AI can introduce artifacts or distortions that standard metrics miss".
Among these metrics, LPIPS is particularly useful for assessing perceptual realism, as it aligns closely with human judgment – lower scores indicate a closer match to the original image. When reviewing images, always zoom to 100% magnification to carefully examine edges, textures, and other critical details. Look for issues like jagged edges, "plastic" or waxy textures, blocky patterns, or color banding. For specific types of images, such as portraits, ensure facial features and skin tones look natural. For architectural shots, check that lines remain straight. For text or logos, confirm that characters stay sharp and legible.
| Metric | What It Measures | Best For | Limitation |
|---|---|---|---|
| PSNR | Signal-to-noise ratio | Measuring noise reduction | Doesn’t reflect aesthetic appeal |
| SSIM | Structure, luminance, contrast | General structural integrity | May overlook subtle texture issues |
| LPIPS | Perceptual similarity | Realism and naturalness | Resource-intensive to compute |
Gather Feedback and Iterate
Feedback is crucial for refining your results. Use a Mean Opinion Score (MOS) system, where evaluators rate images on a scale of 1–5 for overall quality. This method helps you quickly identify areas that need improvement. Pair this with direct comparisons between models to fine-tune your approach.
Pay attention to issues like AI "hallucination", where the model generates plausible but incorrect details. This is especially problematic in product photography, where accuracy is critical for maintaining customer trust. Also, be cautious of "over-beautification", where generative models create visually appealing details that deviate from the original image.
Adjust your upscaling settings based on this feedback, then retest until the results align with your desired standards. This iterative process ensures that both accuracy and aesthetic quality are achieved.
Workflow Integration Checklist
After fine-tuning your upscaled images, the next logical step is embedding AI upscaling into your daily workflows. By integrating this process, you can save time and resources while maintaining consistent image quality. Automated workflows, for example, can reduce processing times and costs by over 90%.
Automate with APIs for Batch Processing
Using APIs for automation is ideal for handling large-scale image upscaling. REST APIs allow you to directly integrate AI upscaling into platforms like your CMS, DAM, or e-commerce systems. Tools such as PixelPanda offer full REST API support, complete with SDKs for easy integration. Whether you’re uploading images via public URLs or local files, the system automatically processes and delivers high-resolution results.
To implement this effectively, organize your files and set up a pipeline with checkpoints and webhooks. Webhooks can notify your system once a job finishes, enabling automatic updates to product pages or other assets without manual intervention.
"After implementing batch processing for our online catalog, what used to take our team three days now takes four hours. The time savings alone covered the cost of our subscription within the first month." – Marco Sanchez, E-commerce Director
Integrate into Marketing and E-Commerce Pipelines
For marketing and e-commerce, dedicated plugins and apps simplify integration. Many workflows now use "on-the-fly" transformations, where images are dynamically upscaled and optimized for delivery to users’ devices. This approach ensures that images are instantly tailored to meet user needs without sacrificing quality or speed.
To maintain consistency, establish a Reference Image System. This system ensures that all upscaled images align with your brand’s visual identity, including color profiles and lighting standards. Additionally, optimize the output for web use to ensure fast loading times.
Train Teams on PixelPanda’s Customizable AI Models
Once automation is in place, training your team becomes essential. Create an Image Processing Playbook to guide them in using PixelPanda’s customizable settings, ensuring consistent results across all projects.
Teams should categorize images before processing since different subjects may require specific upscaling factors (e.g., 2×, 4×, or 8×) and enhancement settings. Introduce a multi-level quality control process, combining automated checks and manual reviews to spot AI artifacts or content loss.
| Method | Best For | Key Advantage |
|---|---|---|
| Web Interface | Small batches (<50 images) | No coding required; simple drag-and-drop |
| Desktop App | Local processing | Convenient for Pro/Business users with local storage |
| CLI Tools | Technical automation | Easy integration with local scripts and cron jobs |
| REST API | Enterprise/High-volume | Seamless integration into proprietary CMS/DAM systems |
Conclusion
The success of AI image upscaling hinges on four essential factors: starting with a high-quality source image, choosing the right tools and models, ensuring precise processing, and regularly evaluating your results. Using low-quality inputs can intensify visual artifacts, which is why careful preparation is key.
The AI image upscaling industry is expected to hit $10.97 billion by 2033, with an annual growth rate of 23.7%. This rapid expansion highlights the growing demand for high-resolution visuals in areas like e-commerce, marketing, and digital content creation. To keep pace, it’s crucial to develop systematic workflows, document your processes, and deepen your understanding of the tools at your disposal. These practices can help you streamline your image enhancement efforts.
PixelPanda’s upscaling features, as discussed earlier, offer a practical solution for simplifying this process. With options for 2×, 4×, and 8× upscaling, full REST API integration, and specialized capabilities for handling intricate textures like hair and fabric, the platform caters to developers, marketers, and e-commerce professionals alike. Whether you’re preparing 300 DPI images for high-quality printing or optimizing product photos for online catalogs, the right tools and approach ensure your visuals maintain their impact, no matter the size.
FAQs
What steps should I take to prepare images for AI upscaling?
Getting the best results from AI image upscaling starts with the right preparation. The quality of your source image plays a huge role – better resolution and clarity at the start mean better results in the end.
Before you upscale, it’s worth making a few tweaks to your images. Start by resizing them thoughtfully, adjusting contrast, and balancing the colors. Removing noise and fixing any artifacts can also make a big difference. Don’t forget to check for consistent color profiles, as this helps the AI create more polished results. If there are unnecessary parts of the image, cropping them out can help the AI focus on the important details.
These simple steps set the stage for sharper, more refined images once the AI does its magic.
What should I consider when choosing an AI tool for upscaling different types of images?
When you’re picking an AI tool to upscale images, it’s all about matching the tool to your specific needs. For high-resolution photos, professional artwork, or detailed product images, look for tools that focus on preserving quality and fine details. For instance, tools like those from PixelPanda use advanced models to sharpen image clarity, making them perfect for restoring old photos or prepping visuals for marketing and print materials.
You’ll also want to consider factors like processing speed, user-friendliness, and how well the tool fits into your workflow. Some tools are great for bulk processing, while others shine when enhancing specific types of content, like AI-generated art or images with intricate backgrounds. Testing the results regularly can help you ensure the tool is delivering the quality you’re aiming for.
The key is to align the tool’s strengths with your project’s demands. Focus on quality for critical images, prioritize speed for less intensive tasks, and always review the results to ensure everything looks its best.
How can I measure the quality of AI-upscaled images?
To gauge the quality of AI-upscaled images, focus on metrics like Peak Signal-to-Noise Ratio (PSNR) and Structural Similarity Index (SSIM). These are great for measuring clarity and how well the structure of the image is preserved. For a more perception-based evaluation, you can use Learned Perceptual Image Patch Similarity (LPIPS) or Fréchet Inception Distance (FID). These tools are designed to ensure your upscaled images not only meet technical standards but also appear natural and visually pleasing to the human eye.