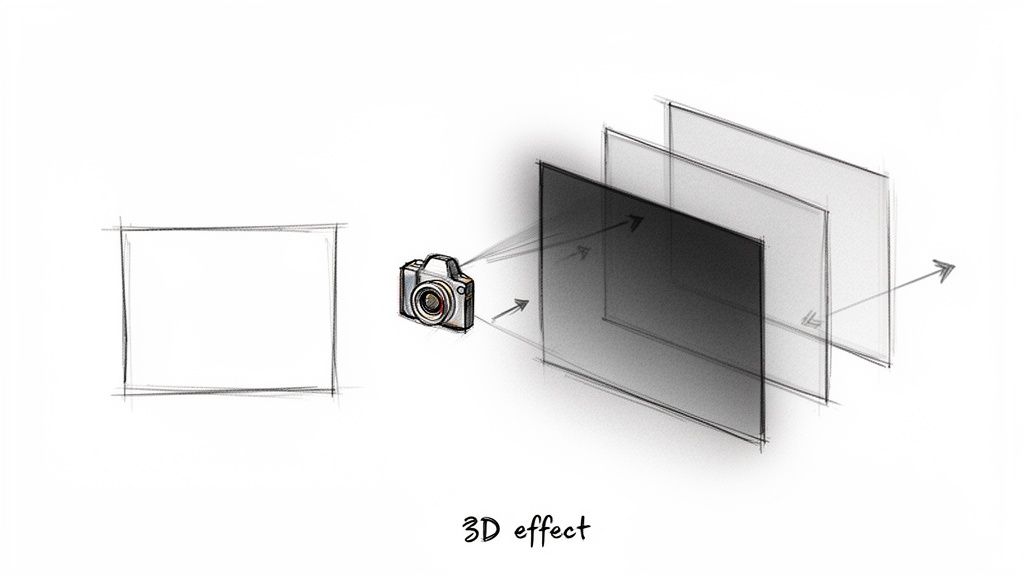
Ever seen one of those photos on your social media feed that seems to pop out and move as you scroll? That's the 3D picture effect at work. It’s a slick trick, sometimes called the parallax or 2.5D effect, that injects life into a flat image, giving it a real sense of depth and motion without getting tangled up in complicated 3D modeling.
From Flat Photos to Immersive Experiences
The magic here isn't exactly new; it's more like a modern remix of a very old tune. The whole idea has its roots in stereoscopic imaging, which is just a fancy way of saying it copies how our two eyes work together to see in 3D. This story kicks off way back in 1838 when Sir Charles Wheatstone cooked up the stereoscope, a gadget that fused two slightly different pictures into one 3D view.
This thing was a hit. It even wowed Queen Victoria at the Great Exhibition in 1851. Fast forward to 1903, and the Lumière brothers had audiences diving for cover from a train that looked like it was bursting right out of the screen in the first-ever 3D film.
Thankfully, we don't need clunky viewers or special glasses anymore. Today's AI does all the heavy lifting, making this once-complex illusion something anyone can play with.
The Secret Sauce: A Depth Map
Behind every cool 3D picture effect is one essential ingredient: the depth map. Just think of it as a secret blueprint for your image. A depth map is a simple grayscale image where the brightness of each pixel tells a story about its distance from the camera.
It’s pretty straightforward:
- White and light gray parts are up close and personal in the foreground.
- Mid-grays are hanging out in the middle ground.
- Black and dark gray areas are way in the back.
This grayscale guide is the instruction manual for the animation software. When the virtual "camera" pans across, the foreground elements (the white bits) move much more than the background elements (the black bits). This creates that convincing parallax motion that tricks our brains into seeing depth where there is none.
The best part? You don't need to be a Photoshop wizard to whip up a depth map. Modern AI can scan a regular 2D photo and spit out a surprisingly accurate one in seconds. This becomes the bedrock of your animation.
Why This Effect Is a Game-Changer Right Now
The 3D picture effect is more than just a neat party trick; it’s a serious engagement magnet. We're all drowning in a sea of static images, so when something moves and reacts, it grabs our attention. This technique turns a boring visual into a mini-story, making it perfect for all sorts of things:
- E-commerce: Imagine product shots that literally pop off the page. It gives shoppers a much better feel for what they're buying.
- Social Media: This is how you create thumb-stopping posts that cut through the endless scroll on Instagram and Facebook.
- Digital Storytelling: It adds a cinematic flair to everything from historical archives to your own family photos.
To really nail the jump from flat to immersive, it helps to understand what an AI picture animator can do. The goal isn't just to show a picture; it's to create an experience.
With tools like the PixelPanda API, developers can now generate these effects automatically and at scale, plugging them right into apps, websites, or marketing campaigns without any tedious manual work. Want to see what I mean? Check out the mind-blowing examples in our hands-on demos: https://pixelpanda.ai/demos.
Choosing the Right Image for Transformation
Here's a little secret: the magic of a jaw-dropping 3D picture effect isn't hidden in some arcane line of code. It starts with the photo you choose. Think of it like cooking—even a Michelin-star chef can't make a masterpiece with wilted lettuce and questionable meat. Picking the wrong image is the fastest way to end up with a wobbly, unconvincing animation that just feels… off.
Let's be real, not every photo is destined for 3D greatness. You need to find images that already have natural depth cues baked right in. An AI, no matter how clever, needs something to grab onto. It's time to train your creative eye to spot the winners from the duds.
What Makes a Photo 3D-Ready
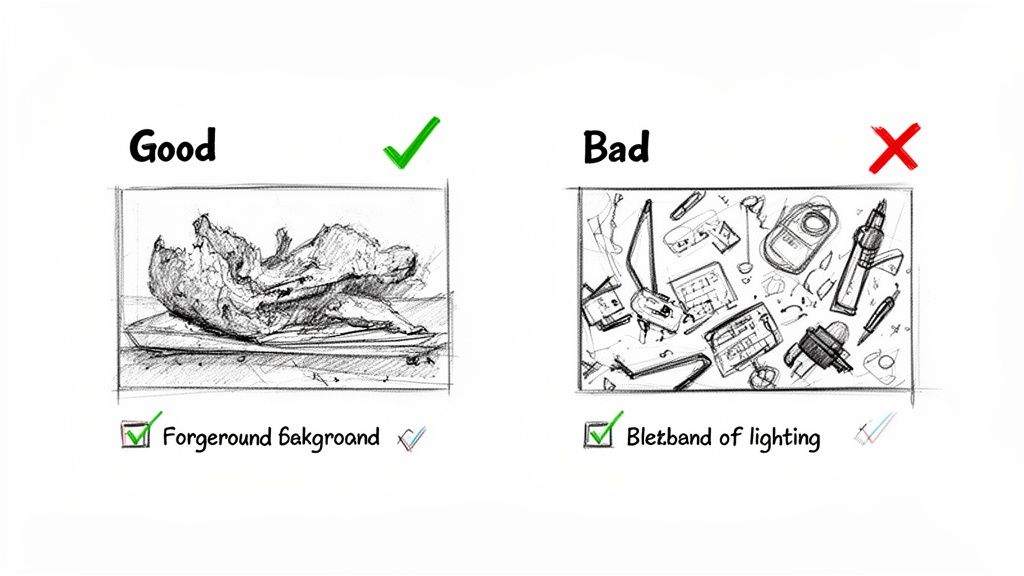
So, what makes a photo a prime candidate for this 3D treatment? It all comes down to a few key traits. The absolute most important one is a clear distinction between the foreground, midground, and background. When these layers are visually obvious, the AI can build a logical depth map without breaking a sweat, and that map is the entire foundation of the effect.
Look for photos with a strong, identifiable subject. A portrait where the person pops against a slightly blurry background? That's a textbook example. A sweeping landscape with a big ol' tree in the front, some mountains hanging out in the middle, and fluffy clouds way back in the distance is another total slam dunk.
Remember, the AI is essentially playing a game of "guess the distance." A photo of a flat, evenly lit brick wall gives it almost zero information to work with. Contrast that with a cobblestone street shot from a low angle—the textures and perspective practically scream "depth!"
Common Pitfalls to Sidestep
Knowing what to look for is half the battle; knowing what to avoid is the other half. Certain types of images will consistently trip up even the smartest AI and lead to head-scratching results. Do yourself a favor and steer clear of these usual suspects:
- Extremely Busy Scenes: Photos packed with tons of overlapping objects and no clear focal point are a nightmare for AI. It struggles to decide what’s in front of what, which inevitably leads to a muddled, nonsensical depth map.
- Flat Lighting: Pictures taken with a direct, head-on flash are notorious for killing the natural shadows that define an object's shape and distance. This lack of light and shadow is like asking the AI to perceive depth while wearing a blindfold.
- Reflective or Transparent Surfaces: Shiny stuff is tricky. Complex reflections in glass, water, or mirrors can confuse the algorithm into thinking the reflected scene is actually part of the foreground, creating some truly bizarre artifacts.
The quest for realistic 3D effects has been a long one. The digital era put it on the fast track with film milestones like The Abyss (1989) and Terminator 2 (1991), which brought photorealistic CGI to the masses. Today, that same drive for realism is reshaping e-commerce, where 3D visuals drove a staggering 67% higher purchase intent in 2022. Thankfully, tools like PixelPanda make this power accessible, letting developers whip up a compelling 3D picture effect in seconds. You can dive deeper into the history of CGI in movies on stikkymedia.com.
Image Selection Checklist for Optimal 3D Effect
To make life easier, here’s a quick-glance checklist. If you can tick these boxes, you're on the right track.
| Image Characteristic | Why It Matters | PixelPanda Solution |
|---|---|---|
| Clear Subject | Gives the AI a focal point to build the depth map around. | The algorithm excels at isolating a primary subject from its surroundings. |
| Distinct Layers | A clear foreground, midground, and background are crucial for a believable parallax effect. | The depth map generator is optimized to detect and separate these planes. |
| Good Lighting & Shadows | Natural shadows provide essential clues about an object's form and position in space. | Our depth enhancement tools can amplify subtle depth cues in the image. |
| Minimal Reflections | Avoids confusing the AI, which can misinterpret reflections as physical objects. | For minor issues, you can manually refine the generated depth map. |
| High Resolution | More pixels mean more data for the AI to analyze, resulting in a cleaner, more detailed effect. | Use the built-in 4x upscaling to enhance image quality before processing. |
Basically, the better the input image, the more spectacular the final animation will be.
Prepping Your Image for Success
Found the perfect photo? Fantastic. Before you toss it to the API, a little prep work can make a world of difference. If your image is a bit soft or on the lower-resolution side, running it through an AI upscaler first is a total pro move.
PixelPanda's 4x upscaling, for example, can sharpen details and essentially feed the depth-mapping algorithm a much richer plate of information. This ensures that every texture, edge, and subtle gradient is crisp, which translates directly to a more detailed and believable animation.
Think of it this way: you're giving the AI a crystal-clear, high-definition map instead of a blurry, folded one you found in your glove box. A sharper input always leads to a superior output.
Crafting Your Depth Map with AI
Alright, this is where the magic really starts. The depth map is the secret sauce, the invisible engine that makes the whole 3D picture effect work. Think of it as a grayscale blueprint that tells the animation software exactly what should pop forward and what should fade into the background. With the PixelPanda API, knocking this crucial part out is unbelievably fast.
So what are you actually looking at when you get one back? It’s pretty simple. The API gives you a grayscale image where pure white means "closest to the camera," and pure black means "farthest away." Everything else falls on a gray gradient in between, creating that smooth, dimensional feel. A great depth map has clean, crisp edges around your main subject and a believable fade into the distance.
But we’re not just here to push a button and hope for the best. While the AI nails it over 90% of the time, sometimes you need to step in and take artistic control. We'll get into how to handle those tricky situations where a little manual guidance can turn a good result into a flawless one.
Your First AI-Powered Depth Map
Making your first API call to generate a depth map is surprisingly easy. You don't need some beast of a server setup; you can run this right from your own computer with just a few lines of code. You're basically just sending your picture over to the PixelPanda endpoint and getting the finished depth map back.
Here's a quick example of how you could do it in Python using the requests library. This assumes you’ve got your API key and your image file ready to go.
import requests
Your API key and image file path
API_KEY = "YOUR_PIXELPANDA_API_KEY"
IMAGE_PATH = "path/to/your/image.jpg"
The API endpoint for depth map generation
url = "https://api.pixelpanda.ai/v1/depth"
headers = {
"Authorization": f"Bearer {API_KEY}"
}
with open(IMAGE_PATH, "rb") as image_file:
files = {"image": image_file}
response = requests.post(url, headers=headers, files=files)
if response.status_code == 200:
# Save the resulting depth map
with open("depth_map.png", "wb") as f:
f.write(response.content)
print("Depth map generated successfully!")
else:
print(f"Error: {response.status_code}")
print(response.json())
And for you frontend folks, you can get the same thing done with JavaScript and fetch. This approach is perfect if you're building a web app where users can upload their own photos and see the magic happen in real-time.
const apiKey = 'YOUR_PIXELPANDA_API_KEY';
const imageUrl = 'https://api.pixelpanda.ai/v1/depth';
const imageInput = document.querySelector('input[type="file"]');
const file = imageInput.files[0];
const formData = new FormData();
formData.append('image', file);
fetch(imageUrl, {
method: 'POST',
headers: {
'Authorization': Bearer ${apiKey}
},
body: formData
})
.then(response => response.blob())
.then(blob => {
const url = URL.createObjectURL(blob);
// You can now use this 'url' to display the depth map
console.log('Depth map URL:', url);
})
.catch(error => console.error('Error:', error));
These little snippets are your launchpad for adding a powerful 3D picture effect to pretty much any project you can dream up.
When a Human Touch is Needed
Every so often, an image throws a curveball. Picture a portrait where fine, wispy hairs are blending into a busy, textured background. The AI might struggle to perfectly separate every single strand, which can sometimes lead to a slightly smudged or "haloed" look in the depth map. This is one of those classic "10% cases" where a little bit of human finesse makes all the difference.
Instead of just accepting the first draft, you can pop the generated depth map into an image editor like Photoshop or GIMP and make some quick tweaks.
- Isolate Your Subject: Grab a soft-edged brush and paint your subject with a slightly lighter shade of gray. This will pull it forward, making it stand out more.
- Refine the Edges: Carefully paint along those tricky edges—like hair, fur, or fabric—to create a much cleaner separation from the background.
- Push the Background Back: If the AI got confused and brought parts of the background forward, just darken them up a bit to push them back where they belong.
Think of yourself as an art director, not an artist starting from scratch. You're just giving the AI's excellent first draft a final polish to get it to perfection.
It’s wild to think about the history here. The core ideas behind computer-generated 3D visuals go all the way back to 1965, when Michael Noll was creating stereographic 3D movies at Bell Labs. Today’s AI tools are the direct descendants of that early work, but now they operate on a scale that was once pure science fiction. PixelPanda, for instance, can chew through 1,000 images per minute via its REST API, maintaining 98% edge preservation on even the most complex subjects. That kind of speed allows marketing teams to churn out 3D product shots that have been shown to boost engagement by up to 94% on platforms like Instagram.
If you're curious, you can read more about the evolution of computer animation on Wikipedia.
Exploring how AI transforms visuals is key to mastering 3D effects. To that end, learning how to create videos with AI from the ground up is a great next step. And for anyone wanting to dive deeper into our specific tools, don't miss our guide on how to make an AI video from a photo.
Animating Your Scene with the PixelPanda API
Alright, you've got your image, and you’ve got a slick depth map. Now for the fun part: bringing it all to life. This is where you get to play director, telling the virtual camera exactly how to move and transforming a static photo into something truly captivating. With the PixelPanda API, you have the controls to create anything from a subtle, elegant drift to a dramatic, Hollywood-style plunge into the scene.
We’re officially moving past the blueprint stage. It's time to send our source image and its depth map to the animation endpoint, along with a few commands that choreograph the camera's journey. Honestly, it feels less like coding and more like staging a tiny, mesmerizing dance for the viewer's eye.
The diagram below shows just how simple the depth map generation part is. It's the foundation of everything we're about to do—taking a standard image and letting the AI create that essential grayscale blueprint for motion.
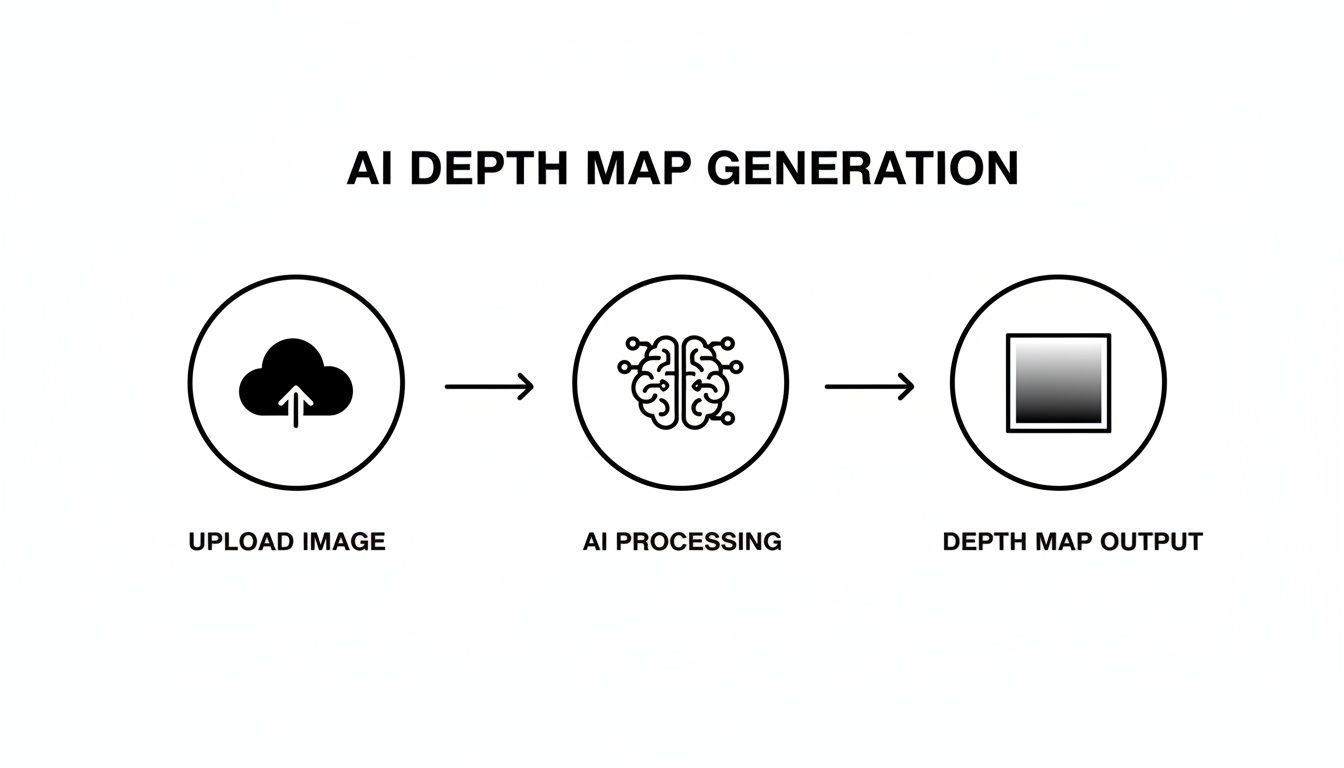
This whole process—upload, AI analysis, and depth map output—is what makes it possible to create these dynamic animations from literally any 2D image. It’s pretty wild.
Directing the Camera with API Parameters
Think of the API parameters as your personal camera crew, ready to execute your creative vision. Instead of yelling "dolly in!" or "pan left!," you'll be setting values for zoom, trajectory, and duration. Getting a feel for these parameters is what separates a 3d picture effect that looks professional and intentional from one that just feels random and jarring.
Let's break down the most important controls at your disposal:
Animation Style: This is your starting point. Want a simple horizontal pan? A gentle zoom-in? Maybe a more complex circular motion? PixelPanda offers a bunch of presets like
dolly_zoom_inorpan_left_to_rightthat deliver fantastic results right out of the box.Zoom Intensity: This one’s simple: how much does the camera push in or pull out? A tiny value creates a subtle, almost subconscious drift. A bigger value creates a much more dramatic, attention-grabbing movement.
Duration: How long is your animation? Setting a duration of 5 seconds will create a smoother, more cinematic feel. A quick 2-second loop, on the other hand, might be perfect for a fast-paced social media story.
Focus Point: This is a real pro-level touch. You can actually tell the API to pivot the entire camera movement around a specific point in your image. In a portrait, for instance, you could set the focus point right on the subject’s eyes to ensure the animation revolves around that critical feature.
The real magic happens when you start combining these. A slow zoom mixed with a slight horizontal pan can create a sophisticated, high-end vibe that’s perfect for showcasing a luxury product. My advice? Experiment. It’s your best friend here.
Exporting Your Masterpiece: MP4 vs. GIF
Once you’ve dialed in the perfect motion, it's time to export your creation. The PixelPanda API lets you output your animation as either an MP4 or a GIF. This isn't just a technical choice; it's a strategic one that affects quality, file size, and where your animation will perform best.
You really need to think about your audience and the platform. Who is this for, and where will they see it?
Here’s a quick look at the key parameters you'll be working with in the API.
PixelPanda Animation API Parameters Explained
| Parameter | What It Controls | Example Value & Result |
|---|---|---|
animation_style |
The camera's path of motion. | 'circle' creates a smooth, orbiting effect around the scene's center. |
zoom_intensity |
The magnitude of the camera's zoom. | A value of 0.2 provides a slow, gentle push-in effect. |
duration_seconds |
The total length of the animation clip. | Setting this to 8 results in a graceful, unhurried motion. |
output_format |
The final file type (MP4 or GIF). | 'mp4' is ideal for high-quality website banners and ads. |
Getting these settings right will make a huge difference in the final look and feel of your animation.
For most web applications, MP4 is the undisputed champion. It gives you vastly superior image quality at a fraction of a GIF's file size. A five-second, high-res MP4 might be just 1-2 MB, while a GIF of similar quality could easily swell to 10-15 MB. That’s a massive difference for page load times, which impacts everything from user experience to SEO.
That said, the humble GIF isn't dead yet. GIFs are perfect for platforms where video auto-play is tricky, like in some email clients. They're universally supported and loop by default, making them great for simple, eye-catching reaction images or UI elements. Just be ready for the hit you'll take on quality and file size.
For any developers looking to build these features directly into their own apps, the best place to start is the official documentation. You’ll find all the code samples and in-depth guides in the PixelPanda developer documentation.
Creative Workflows and Pro Tips
 background remove, depth map, inpainting, and animate for a 3D effect.” />
Alright, you've got the basics down. Now it's time to have some real fun. Making a decent 3d picture effect is one thing, but creating something that stops people dead in their tracks? That's a whole other ballgame. This is where we move beyond single API calls and start thinking like a chef, combining ingredients to cook up something spectacular.
The real magic happens when you start chaining different API endpoints together into a single, powerful workflow. Let’s say you have a killer portrait, but you want to make the person feel like they're floating in a completely different world, totally detached from the original background. You wouldn't just generate a depth map and call it a day. You'd build a sequence.
Chaining APIs for Jaw-Dropping Results
Your first move? Hit the background removal endpoint. This cleanly isolates your subject, giving you a perfect cutout on a transparent background. This step is a total game-changer. Why? Because the depth map you generate next will be created only for that subject, making the 3D effect incredibly focused and precise. No more wasted effort on a background you're just going to discard anyway.
With your cutout in hand, you then send it over to the depth map generator. Now the AI can pour all of its brainpower into understanding the curves, shapes, and details of just your subject. The result is a much more accurate and dramatic depth map.
Finally, you take both the cutout and its shiny new depth map and feed them into the animation endpoint. What you get is a character or product that seems to pop and move with stunning dimension against any new backdrop you can dream up. It’s a pro-level move that turns a flat photo into a show-stopping visual.
Solving the Empty Space Problem with Inpainting
As you start getting more ambitious, you’ll inevitably run into a classic problem. When the virtual camera moves, it often reveals areas of the scene that were originally hidden behind your main subject. This can leave you with ugly, stretched pixels or weird empty gaps along the edges.
This is where smart inpainting becomes your secret weapon. Before you even think about animating, you can use an inpainting tool to intelligently fill in the space around your subject.
Think of it like this: you're giving the animation engine extra canvas to play with. The AI looks at the surrounding textures and content to seamlessly paint in new pixels. This ensures that when the camera pans, there are no bizarre artifacts—just a smooth, believable environment. This one step can take your final 3d picture effect from good to absolutely flawless.
Real-World Inspiration
Theory is great, but let's talk about where the rubber meets the road. People are doing some incredible things with these techniques, going way beyond a simple animated photo.
- E-commerce Brands: Picture dynamic product carousels where every item has a subtle 3D hover effect. A customer mouses over a pair of sneakers, and they gently pop off the screen. This tiny interaction can seriously boost engagement and those all-important add-to-cart rates.
- Marketers: Agencies are churning out thumb-stopping video ads for social media. They'll grab a static, high-impact photo, slice out the background, add a dramatic camera dolly to the subject, and drop it all onto a moving video. Suddenly, they have a high-production-value ad that took minutes, not hours, to create.
- Digital Storytellers: Museums and news outlets are breathing new life into historical photos. By applying a slow, deliberate 3D effect to archival images, they create an immersive experience that pulls you right into that moment in time, making history feel tangible and alive.
Troubleshooting Common Visual Artifacts
Even with the slickest workflow, you’ll sometimes see some weirdness pop up. Don't panic. Most of these issues are a quick fix. The most common culprit is warping, where straight lines in the background seem to bend or curve like a funhouse mirror during the animation.
This usually means your depth map has an overly aggressive or slightly off gradient. The fastest way to fix it is to just dial back the zoom or motion intensity in your animation settings. Often, a more subtle camera move is all it takes to smooth over those minor imperfections and deliver a much cleaner, more professional result.
Got Questions? We've Got Answers
Diving into a new creative tool always sparks a bit of curiosity. Let's tackle some of the most common questions we hear from folks looking to create that killer 3D picture effect. Think of this as your personal cheat sheet.
What's the Best Resolution to Start With?
Honestly, go as big as you can. Always start with the highest resolution image you have available. Why? More pixels give our AI more information to chew on, which translates directly into a cleaner, more precise depth map. This is non-negotiable for images with tricky details like hair, fur, or complex patterns.
While the PixelPanda API is no slouch with lower-res images, you’ll see a world of difference if you feed it something that's at least 1920×1080 (HD). If your source image is a little on the small side, do yourself a favor and run it through our 4x upscaling endpoint first. It’s a simple pre-step that pays off big time in the final animation.
Will This Work on Any Photo?
Technically, you can throw anything at it, but the magic really happens with the right kind of photo. The best images for a convincing 3D picture effect have a clear sense of depth already built-in—think distinct foreground, midground, and background elements. A classic portrait with a nicely blurred background? Perfect. A landscape with a big tree up close and mountains way off in the distance? Chef’s kiss.
On the other hand, some photos are just tough nuts to crack. You might run into trouble with:
- Super flat lighting: A photo blasted with a head-on flash tends to wipe out the subtle shadows our AI uses as clues for depth.
- Really busy scenes: If a photo is cluttered with a million overlapping objects, the algorithm can get confused, and you might end up with a muddled mess.
- Reflective surfaces: Things like glass, mirrors, or even calm water can throw the AI for a loop, as it might interpret a reflection as a real object.
How Does the AI Deal With Tricky Stuff Like Hair and Fur?
This is where the good stuff happens. Our models have been through the wringer, trained on a massive library of images specifically chosen for their complexity. We’re talking about achieving 98% edge preservation, which means the AI is smart enough to see the difference between individual strands of hair and whatever is behind them.
That said, for that last little push to perfection, sometimes a human touch is best. For that final 2%, you can easily export the AI-generated depth map and pop it into your favorite image editor. A few strokes with a soft brush on any fuzzy edges can take your animation from great to flawless.
MP4 vs. GIF: Which One Should I Pick?
Nine times out of ten, MP4 is your hero. It’s just a better format for the web, giving you incredible video quality at a fraction of the file size. A slick, 5-second MP4 animation can weigh in at just 1-2 MB, while a GIF of the same quality might be a whopping 10-15 MB. That’s a huge deal for keeping your website fast and your users happy.
So, when would you ever use a GIF? They still have a couple of tricks up their sleeve. GIFs are universally supported everywhere and loop by default, which can be handy for some email marketing campaigns or simple UI animations where video playback is sketchy. The golden rule? Use MP4 unless you have a very specific reason not to.
Ready to stop reading and start creating? PixelPanda has everything you need to bring your static images to life with stunning 3D effects. Sign up for a free trial and see what you can build.