If you’re wondering how to fix blurry photos, don’t panic. The quickest way to rescue it is with an AI-powered image enhancer. These tools can deblur, sharpen, and even upscale your picture in a few seconds, often with a single click. It’s a modern-day magic trick that analyzes your image and intelligently fixes motion blur, focus problems, or general softness—no technical skills required.
Your Instant Fix for Blurry Photos
We’ve all been there. You capture what you think is the perfect shot, but when you look closer, it’s a blurry mess. It’s a gut-punch feeling, whether you’re an e-commerce seller with a fuzzy product photo right before a huge sale or just trying to save a priceless family memory.
But hold off on hitting that delete button. Before you can fix the problem, you need to figure out what went wrong. Think of yourself as a photo detective. Different blurs have different causes, and knowing the culprit is the first step to a successful rescue mission.
Identifying the Type of Blur
Most blurry photos fall into one of three camps. Once you learn to spot them, you’ll know exactly which tool to reach for.
- Motion Blur: This is the classic “streaky” look. It happens when your camera or your subject moves while the shutter is open. You’ll see tell-tale ghosts or smears, especially in low-light photos where you weren’t using a flash.
- Out-of-Focus Blur: This is when your camera gets confused and focuses on the wrong thing—like the tree behind your friend instead of your friend’s face. The result is a soft, dreamy look, but not where you wanted it.
- Pixelation or Softness: This is a low-resolution problem. When you try to enlarge a small image or zoom in too far, it gets blocky and fuzzy. There just isn’t enough information in the file to create a sharp picture.
This little flowchart can help you quickly figure out what you’re up against.
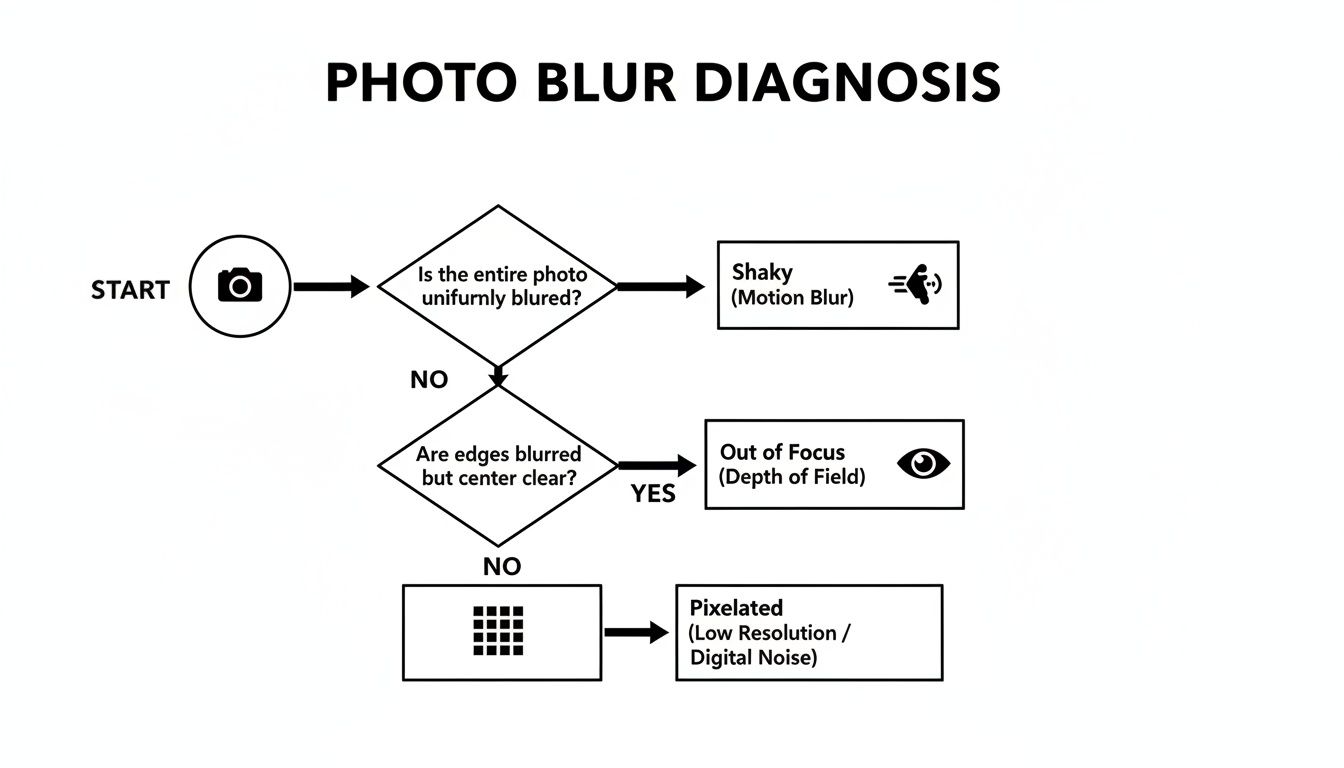
Use this to trace the problem back to its source, and you’re already halfway to a fix.
The secret to fixing a blurry photo isn’t just about cranking up the sharpness slider. It’s about targeted correction—rebuilding lost detail from motion, refocusing the subject, or intelligently adding pixels where they’re missing.
Here’s a quick cheat sheet for diagnosing and fixing blur on the go.
Diagnosing and Fixing Photo Blur on the Fly
Quickly identify the type of blur in your photo and find the best strategy to fix it.
| Type of Blur | What It Looks Like | Best Quick Fix Strategy |
|---|---|---|
| Motion Blur | Streaks, smears, or "ghosting" from movement. | AI deblurring tools are your best bet. They analyze the motion path and reconstruct the details. |
| Out-of-Focus | Soft and dreamy, with the wrong part of the image being sharp. | AI-powered sharpening and focus correction can help, but results vary. Works best on mild focus issues. |
| Pixelation | Blocky, jagged edges, especially when zoomed in. | Use an AI image upscaler. It intelligently adds pixels to increase resolution and clarity. |
Once you know the problem, you can turn to an AI solution. If your image is pixelated, for instance, a free tool like the https://pixelpanda.ai/free-tools/image-upscaler can work wonders by adding crisp new detail.
For a deeper dive into making your images print-ready, check out this guide on how to improve low resolution photos and turn those blurry memories into something sharp and beautiful. Think of this section as your emergency toolkit for getting fast, impressive results.
So, Why Are Your Photos Blurry in the First Place?
Ever get back to your computer, excited to see your shots, only to find they look like they were taken during an earthquake? Before you can master the art of fixing a blurry photo, you have to play detective and figure out what went wrong. Trust me, it’s like preventative medicine for your photography—knowing the cause will save you hours of post-production headaches.
Most blur isn't just bad luck. It’s usually a predictable result of your camera fighting with movement, struggling with low light, or getting confused about focus. Once you learn to spot the tell-tale signs, you can tweak your settings on the fly and start nailing those tack-sharp images right in the camera.
The Usual Suspects Behind Unwanted Blur
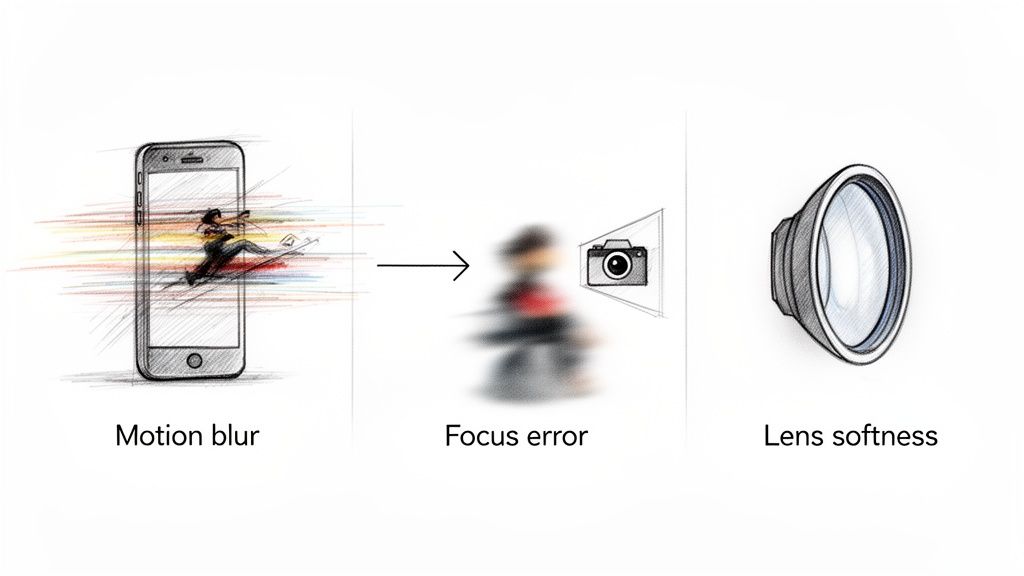
Blur isn't a one-size-fits-all problem. It comes in a few different flavors, and learning to identify them is the first step to a cure. Let's break down the three main culprits that love to sabotage a perfectly good shot.
- Motion Blur: This is the most common party crasher. It pops up when either your subject moves or your own hands shake while the camera's shutter is open. You'll see those distinctive streaks or "ghosting" effects—a classic sign that something was moving when it shouldn't have been.
- Focus Errors: We've all been there. Your camera decides the brick wall behind your friend is way more interesting than their face. The autofocus locks onto the wrong spot, leaving your actual subject looking soft and muddy. It’s a maddeningly common problem, especially when autofocus systems get confused in tricky lighting.
- Lens Softness: Sometimes, it’s not you, it’s your gear. Let’s be real, not all lenses are created equal. Cheaper kit lenses or even expensive ones shot wide open can be inherently less sharp. This usually shows up as a general lack of crispness across the entire frame, not just in one area.
The "why" behind a blurry photo is everything. A shaky hand means you need a faster shutter speed. A missed focus point means it’s time to take control of your autofocus and tell the camera exactly what you want it to see.
Your Pre-Shot Prevention Checklist
Honestly, the absolute best way to fix a blurry photo is to never take one to begin with. Before you press that shutter button, run through this quick mental checklist. It’s especially crucial in challenging spots like a dimly lit restaurant or a chaotic birthday party.
A huge number of blurry photos are simply caused by not having enough light to work with. Taking some time to master a few essential lighting techniques for photography can dramatically cut down on the number of blurry shots you take.
Just a few seconds of prep can be the difference between a keeper and a throwaway.
The Exposure Triangle: Your Anti-Blur Secret Weapon
Getting a sharp photo boils down to managing three core camera settings. They all work together, and finding the right balance is the key to clarity.
- Shutter Speed: This is your number one defense against motion blur, period. To freeze a fast-moving subject—think a running kid or a passing car—you need a fast shutter speed, like 1/500s or even quicker. For static subjects, a good rule of thumb to avoid handshake is to use a shutter speed at least as fast as your focal length (so, for a 50mm lens, shoot at 1/50s or faster).
- Aperture (f-stop): Think of this as your zone of focus, or depth of field. A really wide aperture (like f/1.8) gives you that beautiful blurry background, but it also creates a razor-thin plane of focus, making it incredibly easy to miss your shot. A narrower aperture (like f/8) keeps much more of the scene sharp from front to back, giving you a much larger margin for error.
- ISO: This is your camera's electronic light booster. Bumping up the ISO allows you to use a faster, blur-killing shutter speed in dark conditions. But there’s a trade-off. Pushing the ISO too high introduces digital noise or "grain," which can ironically make your image look softer.
Juggling these three elements is the fundamental skill of photography. Get it right, and you'll give yourself the best possible shot at capturing a crisp, clear image every single time.
Let AI Do the Heavy Lifting to Rescue Your Blurry Photos
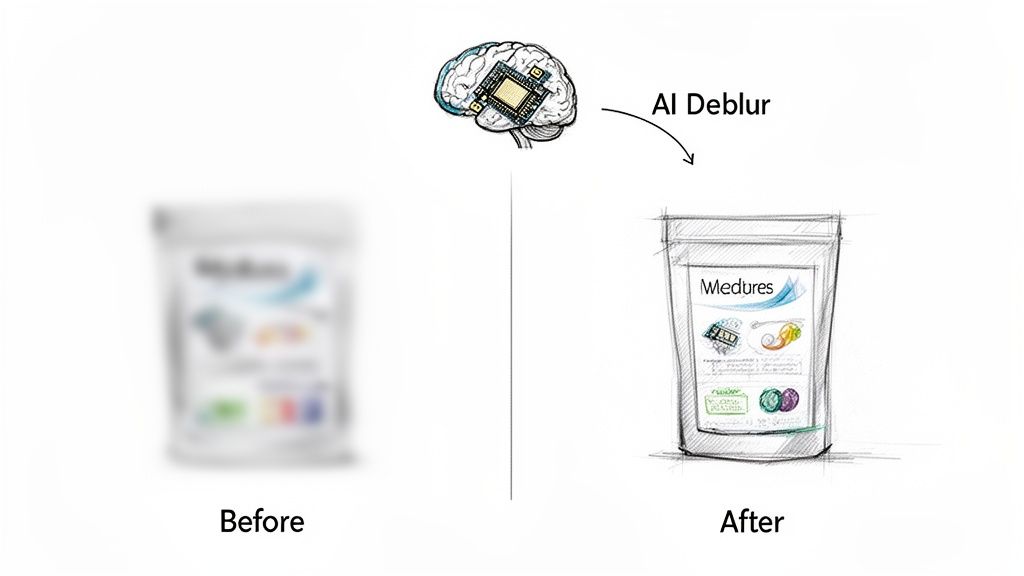
If fiddling with manual sharpening sliders feels like trying to perform surgery with a butter knife, it’s time to embrace the future. Modern AI tools are the secret weapon you've been waiting for, using some seriously smart algorithms to turn a blurry disaster into a crisp masterpiece—often with just a single click. We're not just talking about a basic sharpening filter here; this is genuine image reconstruction.
Tools like PixelPanda have leaped far beyond simple edits. They can actually analyze the type of blur in your photo—whether it's from a shaky hand or a missed focus—and apply a targeted fix. For a shot ruined by motion blur, an AI Deblur feature can literally reverse-engineer the camera's movement and rebuild the details that were lost. The result is a level of clarity that simply wasn't there to begin with.
This Isn’t Your Grandma’s Sharpening Filter
The real magic of AI is its ability to multitask. Let's say you have a photo that’s not only a bit soft but also low-resolution. An AI tool can deblur the image and upscale it at the same time, intelligently adding new pixels to blow it up in size without turning it into a blocky mess.
This is all thanks to a field called computational photography, and it's exploding. The market for these technologies is on track to hit a whopping $31.93 billion by 2026, growing at a blistering 24.2% a year. Why? Because it solves real-world problems. For instance, did you know that motion blur from shaky hands can ruin almost 30% of smartphone pictures in low light? This tech is built to fix exactly that. You can dig into the full computational photography market report to see just how much these algorithms are changing the game.
AI in Action: A Real-World Workflow
Imagine you run an online marketplace and depend on photos from your sellers. Someone uploads a product shot that’s slightly out of focus—a classic problem that can tank sales. Instead of rejecting it and starting over, an automated workflow can save the day.
Here's how that looks in practice:
- Image Upload: The slightly blurry photo hits your system.
- AI Gets to Work: An API call to a service like PixelPanda kicks off a whole sequence of fixes.
- Deblur & Enhance: The AI first applies a deblurring algorithm. If it's a portrait, a specialized Face Enhancement tool kicks in to bring back crystal-clear facial features.
- Upscale for a Pro Look: Finally, it performs a 4x Upscaling, making sure the image is big and sharp enough for any product listing.
- The Final Product: In just a few seconds, a professional-grade photo is ready for your marketplace.
This isn't just a one-off fix; it's a system you can scale. By plugging in an API, a business can churn through thousands of images a day, keeping quality high without a single person having to lift a finger.
So, When Should You Call in the AI?
AI enhancement is your go-to when you need speed, consistency, and fantastic results without getting a degree in photo editing. It’s a total lifesaver in a few key situations:
- Saving Precious Memories: Restoring those irreplaceable (and slightly fuzzy) old family photos.
- Cleaning Up User Content: Automatically sharpening images submitted by customers for reviews or profiles.
- Scaling E-commerce Catalogs: Making sure every single product photo looks crisp and professional.
- Quick Social Media Fixes: Getting that "almost perfect" shot ready for Instagram in minutes, not hours.
By leaning on an AI-powered process, you're not just learning how to fix a blurry photo; you're building a workflow that stops blur from ever being a problem again. For a deeper look at how AI can increase image size and quality, you should check out our guide on how to upscale an image with AI. It’s amazing what you can do when you have professional-level restoration tools right at your fingertips.
Get Your Hands Dirty: Manual Sharpening for Ultimate Control
Sometimes, you just want to be the one calling the shots. When AI feels a bit like a self-driving car, manual sharpening puts you firmly in the driver’s seat. This is where you get to dial in the details, moving beyond a simple "fix" and into the realm of creative refinement.
For anyone who loves that granular control, classic tools like "Unsharp Mask" and "Smart Sharpen" are your absolute best friends. They might sound a bit technical and scary, but they’re surprisingly easy to get a handle on once you know what the sliders actually do. It’s a lot like seasoning a dish—you’re just adding a little something extra to make the flavors pop without going overboard.
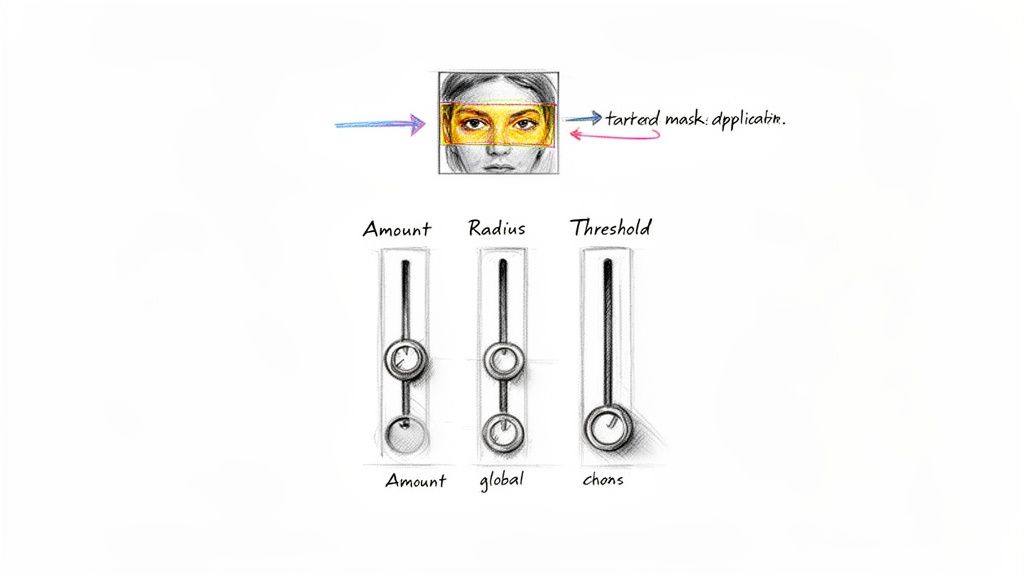
Cracking the Code on Sharpening Sliders
Nailing a manual sharpen comes down to understanding the three main controls. These settings all play together, letting you apply the effect with the precision of a surgeon to rescue your blurry shots.
- Amount: This is the most straightforward one—it's just the strength of the sharpening. Crank it up, and you'll see more contrast along the edges, making them look crisper. My advice? Start low and nudge it up gently. A little bit often goes a very long way.
- Radius: This slider controls how far the sharpening effect "bleeds" out from an edge. For super fine details like the texture in a piece of clothing, a tiny radius is perfect. For bigger, softer edges, you might need to bump it up a bit.
- Threshold: Think of this as your secret weapon for keeping things clean. It tells your software, "Hey, ignore any areas that are already smooth." This is crucial for preventing nasty digital noise from appearing in flat areas like a clear blue sky or smooth skin.
A fantastic starting point I always recommend is to set the Radius somewhere low, maybe between 1.0 and 2.0 pixels, and then play with the Amount until it looks right to you. Tweak the Threshold to protect those smooth gradients from getting all gritty.
Pro Tip: Never, ever sharpen your original image layer. Always duplicate the layer first. This is what we call non-destructive editing, and it means you can easily tone down the sharpening or even erase it from certain spots without messing up your original photo. It’s a total lifesaver.
My Go-To Sharpening Workflow
The real secret to making an image look professionally sharp? Being selective. You almost never want to just slap a sharpening filter over the entire photo. The goal is to guide the viewer’s eye by making the important stuff stand out.
Let’s say you’re working on a portrait. You want the eyes, eyelashes, and maybe the detail in the hair to be tack-sharp. But you definitely don't want to sharpen the skin, which just ends up highlighting every pore and imperfection, giving you a really unnatural, plastic look.
Here’s a simple, targeted workflow I use all the time:
- On a duplicate layer, apply a gentle, overall sharpen with Unsharp Mask or Smart Sharpen. This just gives you a nice, solid base to work from.
- Now, add a layer mask to that sharpened layer. I usually fill the mask with black right away, which completely hides the sharpening effect you just applied.
- Grab a soft, white brush, and turn the opacity way down—somewhere around 20-30%. Now, you can carefully paint back in the sharpness exactly where you want it: over the eyes, on a piece of jewelry, or along the crisp edges of a product.
This technique gives you complete creative freedom. You can build up the sharpness gradually and precisely where it counts. Once you get the hang of this manual approach, you'll stop fixing blurry photos and start artistically enhancing them, ensuring every last detail pops just the way you imagined.
Automating Image Quality for Your Business
Fixing a couple of blurry photos by hand is one thing. It's manageable. But what happens when you’re staring down a pipeline of thousands of images for your e-commerce store or real estate listings? At that scale, manual editing isn't just inefficient—it's a massive bottleneck that grinds your business to a halt.
This is where you stop fighting fires and start building a fireproof system. Automated workflows, powered by a smart image processing API, can ensure every single visual on your platform is consistently sharp and professional without a human having to eyeball it.
Building an Automated Quality Control System
Think about it. A user uploads a new profile picture to your app. Instead of just crossing your fingers and hoping it’s a decent shot, an automated process can check it in a split second. If the image is a blurry mess, the system can either try to fix it with AI or politely reject it with a helpful message, asking for a better version.
This same logic is a lifesaver for product catalogs. We all know blurry product photos are conversion killers. In fact, a jaw-dropping 42% of online shoppers will ditch a purchase because of poor image quality. It's no wonder the AI product photography market is projected to explode to USD 8.9 billion by 2034. Automation is quickly becoming the standard, not the exception. You can dig into more eye-opening numbers in these AI image statistics.
For the developers in the room, this means plugging a service like PixelPanda into your workflow to act as a quality gatekeeper. The setup is surprisingly straightforward:
- Spot the Blur: The system automatically scans every incoming image for blur.
- Fix or Flag: If a photo doesn't pass muster, it can be sent through an AI sharpener or simply rejected.
- Stay Consistent: Every visual, from the main product shot to user-generated content, will meet your brand's standards, every time.
An API-driven workflow flips the script on quality control. Instead of a tedious, reactive chore, it becomes a proactive, automated asset that saves countless hours and keeps your brand looking sharp.
Real-World Use Cases for Automation
The practical applications here deliver immediate, tangible value. Picture a real estate platform where agents are snapping property photos on their phones in a rush. An automated system can instantly deblur and sharpen those shots, making every listing look polished and infinitely more appealing to potential buyers.
Online marketplaces are another perfect example. Forget having moderators manually sift through thousands of new listings. The system can automatically flag or fix blurry photos before they even go live. This doesn't just save an incredible amount of time; it dramatically improves the shopping experience for everyone on the site. If you're wrestling with huge volumes of images, our guide on how to batch process product photos has more a-ha moments for you.
By handing over quality control to AI, you and your team can get back to focusing on growth, all while knowing your visual content is always crisp, clear, and ready to convert.
A Few More Questions About Fixing Blurry Photos
Still got a couple of things rattling around in your head? Good. Getting curious is the first step to mastering a new skill. Let's tackle some of the most common questions that pop up when you're learning how to unblur a photo.
Can a Genuinely Blurry Photo Actually Be Fixed?
Yes, but let's be realistic. Today's AI-powered tools are nothing short of magical for photos with a bit of motion blur or a slightly missed focus. They're smart enough to analyze the blur pattern, guess what the original, sharp details should have been, and rebuild them pixel by pixel.
The catch? There's a point of no return. If your subject is just a featureless, smeared blob, even the smartest AI can't pull a miracle out of thin air. It needs some information to work with. For the typical "oops, my hand shook" or "darn, the autofocus grabbed the background" shot, you'll be blown away by what's possible.
Does Sharpening an Image Make It Worse?
This is a great question, and the answer isn't a simple yes or no. Sharpening works by adding tiny bits of contrast along the edges in your photo to create the illusion of more detail. Technically, this is a "destructive" edit because you're permanently altering the image's data.
Crank that sharpening slider all the way up, and you'll see the downside immediately: weird, glowing halos around objects, grainy textures, and a crunchy, over-processed look. It just looks bad.
The secret is to be gentle. A little bit of sharpening can make an image look crisp and professional. Too much, and you've ruined it.
Pro tip: Always, and I mean always, sharpen on a separate layer in your editing software. That way, if you go overboard, you can just tone it down or delete the layer without wrecking your original photo.
So, What's the Best Tool to Fix Blurry Pictures?
Ah, the million-dollar question! The "best" tool is really about what you need. It’s definitely not a one-size-fits-all deal.
Here’s how I think about it:
- For quick, easy, and surprisingly good results: You can't beat an AI tool like PixelPanda. It's built for one job: fixing your photo with a single click. No learning curve, no confusing sliders, just fast, impressive results.
- For the pros and perfectionists: If you're a photographer who needs absolute control over every little detail, then you’ll want to stick with something like Adobe Photoshop. Its tools, like the Unsharp Mask filter, give you incredible power, but you'll need to invest the time to learn how to use them properly.
- For businesses and big projects: If you're dealing with hundreds or thousands of product photos, doing it by hand is a nightmare. An API is your best friend here. It automates the whole process, checking and fixing images on the fly so everything looks consistently sharp and professional.
At the end of the day, the right tool is the one that solves your problem without giving you a headache.
Ready to stop wrestling with blurry photos for good? PixelPanda wraps up AI deblurring, upscaling, and other enhancements into one dead-simple platform. Try it for free and watch your photos sharpen up in seconds.