
So, you want to remove a background from an image with AI? It’s not just about clicking a button. Behind that simple action is some seriously clever tech that’s completely changed the game for anyone working with images, from e-commerce sellers to marketing pros.
These tools don’t just “delete” the background; they use sophisticated machine learning to automatically find what matters in your photo and separate it from everything else. The result is a clean, precise cutout with a transparent background, usually ready in just a few seconds.
The Real Magic Behind AI Background Removalixelpanda.ai/free-tools/background-remover”>Background Removal
Ever been stumped trying to isolate wispy hair or fuzzy fur from a busy background? You’re not alone. For years, it was a manual, painstaking process. Now, AI does the heavy lifting in a blink, turning a nightmare task into an automated dream.
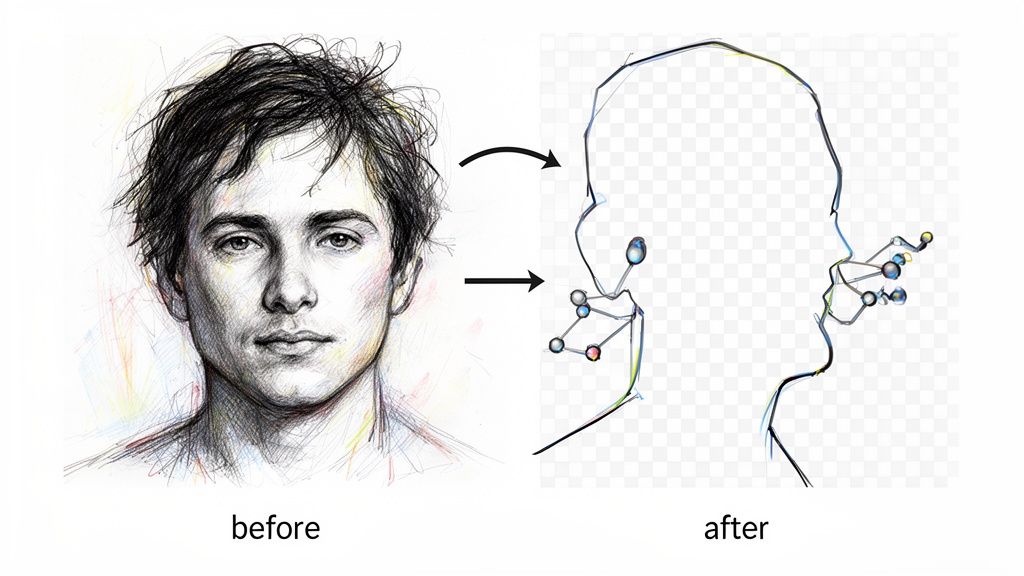
This isn’t your grandma’s magic wand tool from an old photo editor. Modern AI uses a technique called semantic segmentation. In simple terms, the AI doesn’t just see a blob of pixels; it actually understands what’s in the photo. It knows the difference between a person and a park bench, a t-shirt and a tree.
That leap from seeing pixels to understanding context is precisely what lets these tools nail the tricky bits that would take a human designer hours to get right.
From Pixels to Perfection
So, what’s actually happening under the hood? It’s a pretty slick combination of massive datasets and smart algorithms.
- Training on Millions of Images: The AI models are shown a huge library of images where people have already traced the subjects. This is how the AI learns the tell-tale signs of different objects, from the texture of denim to the fine strands of hair.
- Context is Everything: The AI builds a contextual model of what a “person” or a “product” looks like. This lets it make educated guesses to fill in the gaps, even when the edges are blurry or the lighting is poor.
- Alpha Matting for the Finesse: For the really tough stuff—like smoke, glass, or a pet’s fluffy tail—the best models use something called alpha matting. This isn’t just a simple cut; it calculates the exact transparency level for every single pixel along the edge, which is how you get those incredibly smooth, natural-looking results.
This technology isn’t just a gimmick; it’s a massive commercial driver. The market for image background removal tools is exploding, valued at USD 1.38 billion in 2024 and on track to hit USD 2.38 billion by 2032. Why? Because e-commerce and marketing teams need to crank out high-quality visuals faster than ever. You can read the full research about this market expansion to see just how big this is getting.
Why This Matters for Your Workflow
Knowing how this tech works isn’t just for kicks—it helps you see why it’s so powerful. It’s more than a party trick; it’s a fundamental shift in how we handle visual content.
When you let an AI handle the tedious, repetitive job of masking images, you free up your creative team for what they do best. That reclaimed time goes straight back into brainstorming campaigns, refining designs, and crafting better content.
This is exactly why tools like PixelPanda exist. They take all this complex AI and package it into a straightforward API. Suddenly, any developer or business can plug studio-quality editing right into their own apps. This is the foundation for automating your entire visual pipeline, whether you’re processing thousands of e-commerce product shots or generating social media posts on the fly.
It’s all about working smarter, not harder.
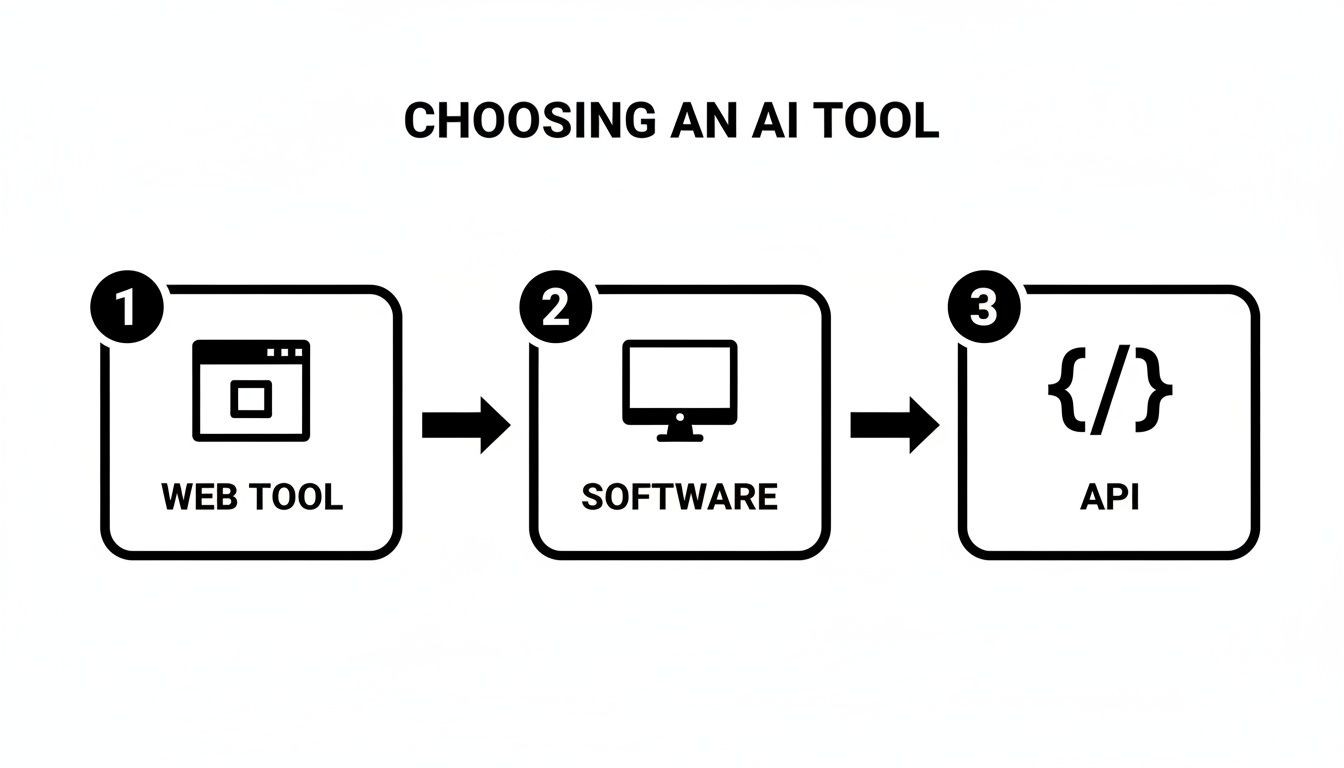
Choosing Your AI Weapon for Background Removal
Stepping into the world of AI background removal feels like walking into a massive armory. Everywhere you look, there’s a different tool promising pixel-perfect results. But just like you wouldn’t bring a butter knife to a sword fight, the right tool depends entirely on your mission. Not every solution is built for the same battle.
The options generally fall into three camps. You’ve got your quick-and-easy web-based tools, your more robust standalone software, and the heavy artillery for developers: APIs. Each serves a distinct purpose, from zapping the background on a one-off social media graphic to processing an entire e-commerce catalog of 50,000 product shots overnight.
Getting this decision right is the difference between a tool that feels like a superpower and one that just creates more headaches. Your choice will hinge on a few critical factors: accuracy, speed, scalability, cost, and how neatly it plugs into your existing workflow.
Comparing AI Background Removal Solutions
So, how do you pick? It really comes down to who you are and what you’re trying to accomplish. A casual user needing a clean profile picture has vastly different needs from a developer building an automated remove background from image ai feature into their app.
Here’s a quick head-to-head comparison to help you find your fit.
| Feature | Web-Based Tools | Standalone Software | Developer APIs (e.g., PixelPanda) |
|---|---|---|---|
| Accuracy | Variable; often struggles with complex edges like hair. | High; allows manual refinement for perfect results. | Excellent; trained on massive datasets for superior edge detection. |
| Speed | Fast for single images, but slow for bulk work. | Depends on user skill; not designed for speed at scale. | Blazing fast; processes thousands of images in minutes via code. |
| Scalability | Poor; not suitable for high-volume processing. | Not scalable; requires manual work for every image. | Extremely high; built for massive, automated workflows. |
| Integration | None; operates as a standalone website. | Limited; may offer plugins for other software. | Seamless; designed to be integrated into any application or script. |
| Best For | Casual users, marketers needing a few quick edits. | Professional photographers, graphic designers. | Developers, e-commerce platforms, large-scale content teams. |
The takeaway is clear: for one-off tasks, a web tool is fine. For high-stakes creative work, standalone software gives you control. But for anything involving volume and automation, an API is the only real game in town.
Your Arsenal of Tools, Explained
Let’s dig a little deeper into what each of these options really means for your day-to-day work.
-
Web-Based Tools: These are the most accessible. You drag, you drop, and you download. They’re perfect for quick, infrequent tasks where convenience is king. The trade-off? They almost never offer batch processing and lack the fine-tuned control needed for truly professional results.
-
Standalone Software: Think desktop applications like those in the Adobe suite or specialized plugins. They offer more power, precision, and the comfort of offline access. These are great for designers and photographers who need to get in there and manually perfect the masks on high-stakes images. The obvious drawback is that it’s all manual labor—they simply don’t scale.
-
Developer APIs (like PixelPanda): This is the ultimate weapon for scale and automation. An API lets you wire the AI’s power directly into your own website, application, or workflow. You can write simple scripts to process thousands of images without lifting a finger, making it the only viable path for large-scale e-commerce, user-generated content platforms, and SaaS products.
If you’re weighing the API options, our detailed comparison of PixelPanda versus Remove.bg breaks down the key differences you’ll want to consider.
The best AI isn’t just about a clean cutout. It’s about how that cutout is created. Does it preserve fine hair detail? Can it handle translucent objects? A top-tier API gives you consistent, high-quality results without forcing you to compromise on the tricky details.
As you explore, it’s critical to choose an AI background removal tool that actually fits your world. What works for a solo creator is entirely different from what an enterprise needs for its product pipeline. Be realistic about your volume, quality standards, and technical savvy to make a choice that will genuinely speed things up, not slow you down.
Time to Get Our Hands Dirty: Making AI Cutouts That Actually Work
Alright, enough with the theory. Let’s roll up our sleeves and see how this AI magic really gets done. We’re going from high-level concepts to actual code, and I’ll walk you through exactly how to remove a background from an image with AI using a real-world API. We’ll use PixelPanda for our examples, but the core logic is the same for any decent API-driven tool out there.
First up: your very first API call. Don’t sweat it if you’re not a coding guru. We’ll break down every piece with simple, commented code snippets in both Python and JavaScript. The mission is simple: send an image, and get a perfect cutout with a transparent background back.
This whole process boils down to three main ways you can tackle background removal, depending on what you’re trying to accomplish.
As you can see, there’s a clear path from quick one-off jobs (perfect for web tools) all the way to the heavy-duty, scalable power of an API built for massive workloads.
Your First API Call: A No-Nonsense Walkthrough
Making an “API call” sounds super technical, but it’s not. It’s just sending a message to a server with your instructions. You tell it which image to work on and what you want back. The server does all the complex thinking and sends you the finished file.
Think of it like ordering a pizza. You tell the shop you want a large pepperoni, give them your address (the image URL), and they deliver the final product (your processed image). Simple as that.
For our first go, we’ll use a basic Python script. It’ll send an image URL to the PixelPanda API and save the result as a new file.
import requests
Your unique API key from your PixelPanda account
API_KEY = “YOUR_PIXELPANDA_API_KEY”
The URL of the image you want to process
IMAGE_URL = “https://example.com/your-product-image.jpg“
response = requests.post(
“PixelPanda Background Removal API“,
headers={“Authorization”: f”Bearer {API_KEY}”},
json={“image_url”: IMAGE_URL}
)
Make sure everything went smoothly
if response.status_code == 200:
# Save the new image with its transparent background
with open(“output_image.png”, “wb”) as f:
f.write(response.content)
print(“Background removed successfully!”)
else:
print(f”Error: {response.status_code} – {response.text}”)
See? All we’re doing is authenticating with an API key and pointing to our source image. The API handles the rest, sending back a crisp PNG with a perfectly transparent background. Want to see it in action without writing code? Go ahead and play around with our interactive background removal demo.
Going Big: Batch Processing More Than One Image
One image is cool, but what happens when you have an entire product catalog of 10,000 images that need a refresh? Doing that by hand is a nightmare. This is where a simple batch processing script becomes your new best friend.
The core idea is to write a loop that just feeds a list of images to the API, one after the other. A manual project that would take a week suddenly becomes a script you can kick off and let run overnight.
Here’s how you’d adapt that Python script to chew through an entire folder of images:
- List Your Files: Grab a list of all the image files in your source folder.
- Loop and Process: Run through that list, sending each image to the API.
- Save the Results: Save each new transparent PNG to an output folder, maybe giving it a new name to keep things tidy.
This kind of workflow is the backbone of modern e-commerce and marketing. In fact, the AI Image Editor market is projected to hit a wild USD 88.7 billion in 2025, with big companies accounting for 42% of that spending as they automate their visual production lines. For these teams, tools like PixelPanda that deliver on both accuracy and speed can slash manual editing time by up to 90%.
The real game-changer with an API isn’t just how fast it edits one photo; it’s that it lets you obliterate the entire manual workflow. Once you set up batch processing, you’ve essentially built a tireless engine that works for you 24/7.
Fine-Tuning the Output for Perfect Results
A great API doesn’t just do the work; it gives you knobs to turn. You’ll inevitably need to adjust settings to get the perfect result for different kinds of photos.
- Output Format: PNG is the king of transparency, but you might occasionally need something else.
- Quality Settings: Tweaking compression levels is a constant balancing act between file size and image quality—super important for fast-loading websites.
- Foreground Hints: Some of the more sophisticated APIs let you give them hints about what the main subject is. This is a lifesaver for really cluttered or complex photos.
Here’s what a slightly more advanced call might look like, this time in JavaScript (Node.js) using the axios library. We’re uploading a local file and telling the API we specifically want a PNG back.
const axios = require(‘axios’);
const fs = require(‘fs’);
const API_KEY = ‘YOUR_PIXELPANDA_API_KEY’;
const IMAGE_PATH = ‘./path/to/your-image.jpg’;
async function removeBackground() {
try {
const response = await axios.post(
‘PixelPanda Background Removal API‘,
{
// Sending the image file directly as a Base64 string
image: fs.readFileSync(IMAGE_PATH).toString(‘base64’),
output_format: ‘png’ // Explicitly ask for a PNG
},
{
headers: {
‘Authorization’: Bearer ${API_KEY},
‘Content-Type’: ‘application/json’
},
responseType: ‘arraybuffer’ // We need to handle binary image data
}
);
fs.writeFileSync('output_image.png', response.data);
console.log('Background removed!');
} catch (error) {
console.error(‘Error:’, error.response.data.toString());
}
}
removeBackground();
This hands-on approach pulls back the curtain, showing you don’t need a Ph.D. in machine learning to put this incredible tech to work. With just a handful of code, you can build a powerful, automated system ready to handle any number of images you can throw at it.
Tackling the Tough Stuff: Hair, Fur, and Glass
This is where the rubber meets the road. Anyone can remove the background from a picture of a coffee mug, but what about the really tough subjects? I’m talking about the final bosses of photo editing: the wispy strands of hair in a portrait, the soft fluff of a dog’s fur, or the see-through shimmer of a wine glass. This is where most tools throw up their hands and leave you with a jagged, amateurish mess.
Forget about those clunky, tell-tale halos around your subjects. The secret sauce for conquering these challenges is a sophisticated technique called alpha matting. This isn’t just a simple “foreground” or “background” decision. Instead, the AI calculates the exact transparency level for every single pixel along the edge, from 100% solid to completely see-through and all the subtle shades in between.
That’s how you get cutouts that look like a seasoned pro spent hours meticulously editing them, not like something spat out by a basic algorithm.
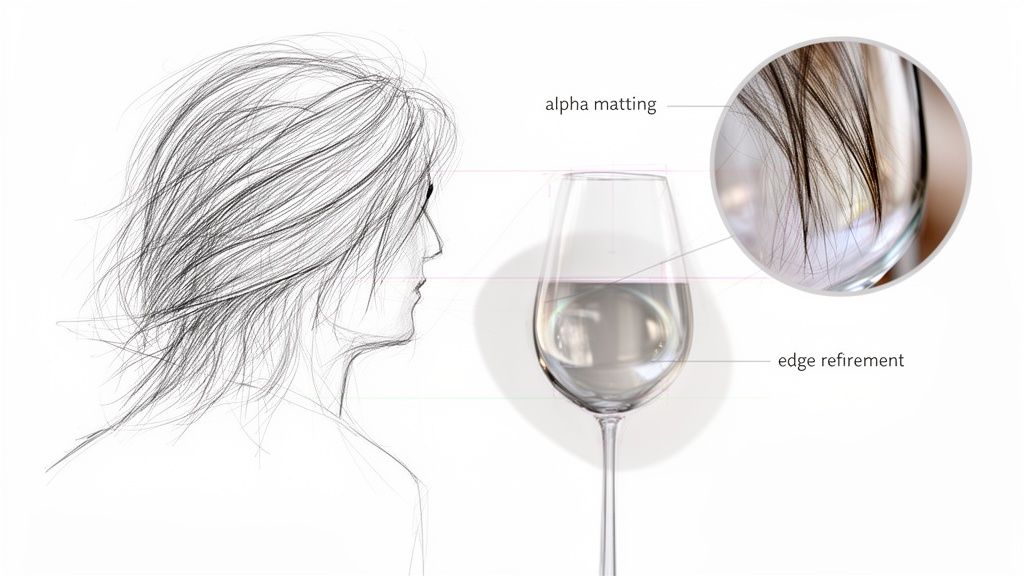
Nailing Hair and Fur
Let’s get real. For a portrait, the hair can make or break the shot. A clumsy cutout that lops off fine strands or creates a “helmet head” effect instantly screams “fake.” To avoid this disaster, you need an AI that can see beyond the solid mass and actually respect the individual filaments.
You can help the AI out by starting with a good source image. While a top-tier AI can work magic, it’s always going to perform better with clean data. A model with dark hair against a simple, light background will almost always give you a cleaner initial result than someone standing in front of a busy, similarly colored brick wall.
An advanced AI doesn’t just cut around the hair; it models the softness. It gets that the edges aren’t sharp lines but gradual transitions, which is what preserves the natural feel and makes a portrait believable.
Dealing with Transparency and Reflections
Glass, sheer fabrics, and water are a whole other level of tricky. These subjects aren’t just defined by their shape; they’re defined by what you can see through them. A basic background remover will often treat a wine glass like a solid object, either filling it in or creating a bizarre, chunky outline.
A truly capable remove background from image ai tool, on the other hand, creates a semi-transparent mask. It cleverly preserves the reflections and refractions that make the object look real, letting you drop it onto a new background while keeping its glassy essence intact.
Here’s a look at how a high-end AI like PixelPanda approaches these challenges versus a more basic tool:
| Tricky Subject | Basic AI Tool's Approach | Advanced AI (Alpha Matting) Approach |
|---|---|---|
| Wispy Hair | Creates a hard, helmet-like edge, losing all fine detail. | Renders a soft mask that preserves individual strands and flyaways. |
| Pet Fur | Produces jagged, "stair-step" edges that look unnatural. | Models the soft, fuzzy texture of the fur for a seamless blend. |
| Glass Objects | Treats the object as solid, ignoring transparency and reflections. | Creates a semi-transparent mask that retains realistic refractions. |
| Sheer Fabric | Makes the fabric opaque, losing all sense of delicacy. | Preserves the see-through quality for an authentic result. |
This attention to detail is non-negotiable, especially in e-commerce. If you're selling a delicate silk scarf or elegant glassware, your product photos have to look authentic. If they look fake, customer trust evaporates.
Pro Tips for Perfecting Your Cutouts
Even with the best AI in your corner, you can still take a few steps to guarantee flawless results. These small tweaks to your workflow can make a massive difference, especially when you're automating at scale.
- Start with High-Resolution Images: Garbage in, garbage out. Give the AI the best possible source material. A sharp, well-lit, high-res photo has more pixel data for the model to work with, which leads to much more accurate edge detection.
- Check Your API Parameters: Dig into the API documentation. Look for settings related to edge refinement or detail levels. Services like PixelPanda sometimes offer different processing modes—you might find a "high detail" or "refinement" option designed for exactly these tricky subjects.
- Use a Feathered Mask for the Toughest Cases: For that last 1% of exceptionally difficult images, you can add a finishing touch. A common pro trick is to take the AI's output and apply a tiny 1-2 pixel feathering effect to the mask. This subtly softens the edge and helps it blend more naturally into any new background.
Mastering these difficult subjects is what separates a good automated workflow from a great one. It ensures your final images, whether for a product listing or a marketing campaign, look professional and polished, building the kind of trust that turns browsers into buyers.
Weaving AI Removal into Your Daily Workflow
A powerful AI tool sitting unused is just a line of code. The real magic happens when you move beyond one-off edits and build a fully automated system that hums along in the background. This is where strategy comes in—how to weave a remove background from image ai tool into your existing systems to unlock some serious efficiency.
For developers, this means building solid integrations into apps and services. For marketing and e-commerce teams, it’s about creating hands-off automation "recipes." Imagine connecting your product database directly to an API, so every new photo is automatically processed and ready for your storefront without a single click.
Building Resilient Developer Integrations
When you're building an API integration, you're not just making calls; you're building a digital pipeline. And like any good pipeline, it needs to be tough enough to handle hiccups without falling apart. Thinking about failure points from the very beginning will save you from frantic debugging sessions down the road.
Proper error handling is non-negotiable. What happens if an image URL is broken or the API is temporarily down? Your code should be smart enough to catch these issues, log the error, and maybe queue the image for a retry. Never assume every request will be a home run.
Performance is the other big piece of the puzzle. If you're sending thousands of images, firing them off one by one is painfully slow. Instead, use asynchronous requests to process images in parallel. This can dramatically slash your total processing time, turning what could be a multi-hour job into something that’s done in minutes.
Real-World Automation Recipes for Teams
You don't need to be a coding wizard to build incredible automations. Modern no-code tools can connect different services, creating powerful, hands-off workflows that just work.
Here are a few practical ideas to get you started:
- The Cloud Storage Trigger: Set up an automation that watches a specific folder in your cloud storage (like an S3 bucket or Dropbox). When a new image lands in that folder, it automatically triggers an API call to remove the background and saves the finished PNG to a "Ready for Web" folder.
- The Product Management Hook: Connect your Product Information Management (PIM) system or even a simple spreadsheet. A script can monitor for new product entries, grab the image URL, process it via the API, and then update the product record with the new, clean image URL.
- The Social Media Content Engine: Link your content calendar to the API. When a new post is scheduled, an automation can grab the source image, create a clean cutout, and instantly layer it onto a branded template, ready for posting.
These aren't futuristic concepts; they're happening right now. The AI Image Editor market, which hit USD 88.7 billion in 2025, sees enterprises commanding a massive 42.3% market share. They're pouring resources into tools that streamline exactly these kinds of workflows.
The goal is to make background removal a silent, invisible part of your production engine. The best automation is the one you set up once and completely forget about because it just works, saving your team hundreds of hours.
From Cutout to Conversion
Creating a perfect cutout is a huge win, but it's just one step in the journey. After getting those flawless cutouts with AI, the next critical move is to optimize images for web to ensure your site loads lightning-fast and your SEO stays strong. A beautiful but bloated image file can slow down your site and kill your sales.
By combining an automated remove background from image ai process with smart optimization, you create a seamless pipeline from raw photo to a conversion-ready asset. This strategic thinking transforms a simple editing tool into a core part of your growth engine.
And if you're wrangling large catalogs, check out our guide on how to batch process product photos for even more tips to make your life easier.
Got Questions About AI Background Removal? We've Got Answers.
Jumping into the world of AI background removal always stirs up a few questions. Whether you're a developer poking around an API, a marketer with a mountain of product photos to climb, or a designer just trying to get home at a decent hour, you've probably got a few "what ifs" floating around. Let's cut through the noise and get you some straight answers.
This isn't just about the "how." It's about tackling the real-world curveballs that pop up when you start making this tech a part of your workflow. Getting these things sorted is the difference between just using a tool and truly mastering it.
How Does AI Handle a Photo with Multiple People?
Great question. It's not magic, but it’s close. Modern AI doesn't just see a blob of pixels; it uses a technique called semantic segmentation. Think of it as the AI's ability to actually understand what's in the picture, identifying and separating different people and objects.
The best services usually handle this without breaking a sweat, automatically figuring out who the main characters are. But what if you need to isolate someone in the background? Some APIs give you the option to pass along hints or coordinates, telling the AI exactly which part of the photo you want to keep. This gives you pinpoint control, even in a crowded scene.
What’s the Best File Format for a Transparent Background?
PNG. Full stop. Don't even think about anything else.
PNG is the go-to because it supports an "alpha channel." That’s the techy term for the layer of data that tells each pixel how transparent it should be. If you try to save a cutout as a JPEG, all your beautifully transparent areas will be filled in with a solid color (usually white), and all your hard work goes down the drain.
Always, always, always save your cutouts as a PNG. It's the only way to preserve those clean edges and give yourself the freedom to drop your subject onto any new background you can dream up.
This is non-negotiable, especially when you’re dealing with tricky details like wisps of hair or the fuzz on a sweater. The PNG format is what keeps all that intricate detail looking sharp.
Can I Really Automate This for Thousands of Images?
You bet. In fact, that's the whole point. This is the superpower you get when you use a proper remove background from image AI API. Forget the soul-crushing tedium of uploading images one by one to some web tool. You can write a dead-simple script that chews through an entire folder of images or a list of URLs while you're out getting coffee.
This is called "batch processing," and it’s exactly what services like PixelPanda were built for. They’re engineered to take on thousands of requests at once, letting you process an entire product catalog overnight. Seriously, you can just set it and forget it.
What Does This Actually Cost When You’re Doing a Ton of Images?
The pricing models are usually based on a per-image or credit system, and the beauty is that the price per image plummets as your volume goes up.
Put it in perspective: getting a designer to manually cut out a single image could run you anywhere from $5 to $20, maybe more if it's complicated. With a good API, you're looking at just a few cents for that same image. The return on investment is a no-brainer when you calculate the hours and dollars saved. Most services offer a free trial, which is the perfect way to kick the tires and see the quality for yourself before you pull out your wallet.
Ready to reclaim your time from the drudgery of manual editing? PixelPanda offers a developer-first API and a ridiculously smart AI to deliver perfect, studio-quality cutouts at any scale. Try PixelPanda for free and see the difference in seconds.